

we can help
More and more seed-stage and early-series SaaS companies are sprinting to Webflow as their website platform of choice, and it’s easy to see why.
Webflow is a no-code website builder that offers customization options that make on-page SEO a breeze. That makes it a no-brainer for SaaS companies who want SEO best practices baked into their web pages from the get-go.
Ten Speed’s website is built on Webflow, so we’re confident in its ability. Plus, companies like Gorgias, Nutrisense, and Accrue Savings have also seen the benefits of Webflow for SEO.
If you’re thinking about using Webflow but aren’t sure where to start, you’ve come to the right place.
If you’re used to WordPress, Webflow optimization might feel unnatural at first — but it doesn’t have to. We’ve put together this in-depth resource to help ensure that your search engine optimization efforts start on the right foot so you can improve your search rankings and grow your organic traffic.
If you want to know more about our experience with Webflow, check out our recent podcast episode, where we highlight pros and areas of improvement:
Is Webflow good for SEO?
The short answer: Yes.
Webflow and the Webflow CMS are just as good for SEO as any other platform that you’re used to using. For early-stage SaaS companies that want an SEO-friendly site builder, Webflow is a great solution. A few highlights:
- User-friendly responsive designs load quickly for a seamless experience
- Metadata is easy to include and edit with built-in SEO tools
- SSL certificates included for all hosted sites
- Powerful CMS makes content creation and organization simpler
You may notice that the UX initially feels clunky if you’re used to being on WordPress, Squarespace, or Wix, but after a few weeks, it’ll become second nature. It’s like switching between an Android phone and an Apple phone. You’ll soon realize you can optimize a lot of your website without a professional web development agency or freelancer’s help.
Optimize your Webflow website for SEO success
If you want to see an increase in organic site traffic, you have to think about SEO. It’s a pivotal aspect of your online presence that can convert your target audience into happy customers. With Webflow, many aspects of your SEO strategy are made easy:
- Build brand identity and domain authority in one sweep.
- Increase time spent on your site by positively impacting user experience.
- Use canonical tags and custom schema to allow search engine crawlers to easily navigate your site.
But as powerful as Webflow is, it isn’t always the most intuitive. There are a few hurdles to jump:
- Backend’s visual interface takes some getting used to
- Manual configuration means more set-up time
- Fewer SEO plugins available compared to other website hosts
- Most helpful with a basic understanding of HTML and CSS
- Won’t optimize your site for you — you’ll still need to understand SEO best practices
Touring the Webflow tools for the basic on-page technical SEO functions
Webflow’s built-in functionalities are expansive. You’ll find everything you need to perform basic SEO, plus a few more complex features, like adding custom schema data, adding HTML hreflangs, and incorporating canonical tags to improve crawlability.
Keep in mind that Webflow prides itself on the fact that you don’t need plugins like its competitors. Whether or not that’s a strength is up to you to decide.
Let’s take a quick tour of where you’ll find standard SEO features and fields within Webflow’s designer and content editor UI. These features are built-in, although not entirely obvious, depending on the template you choose.
Title tags and meta description
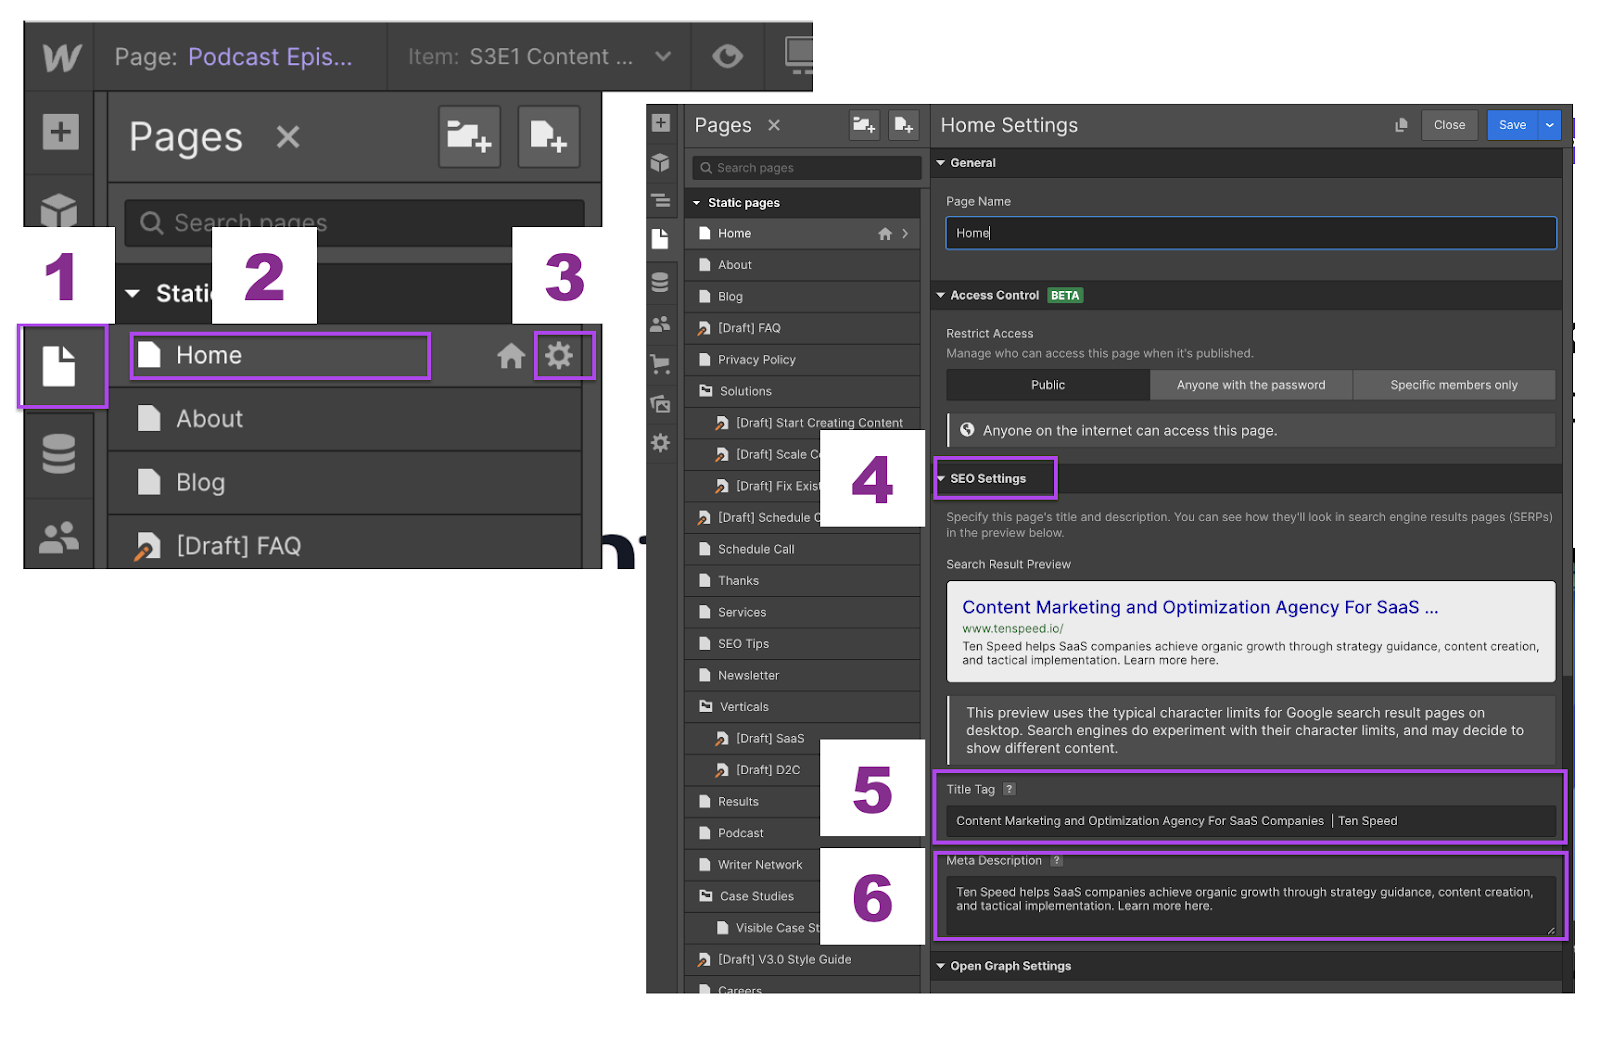
Webflow allows you to add, templatize, and customize your title tag and meta descriptions.
- Find the Pages panel on the left navigation bar in the design view.
- Find the page you want to add a title tag and meta description to.
- As your mouse moves over that page, a settings cog icon appears that you should click.
- Click on the “SEO settings” dropdown.
- Add a title tag.
- Add a meta description.
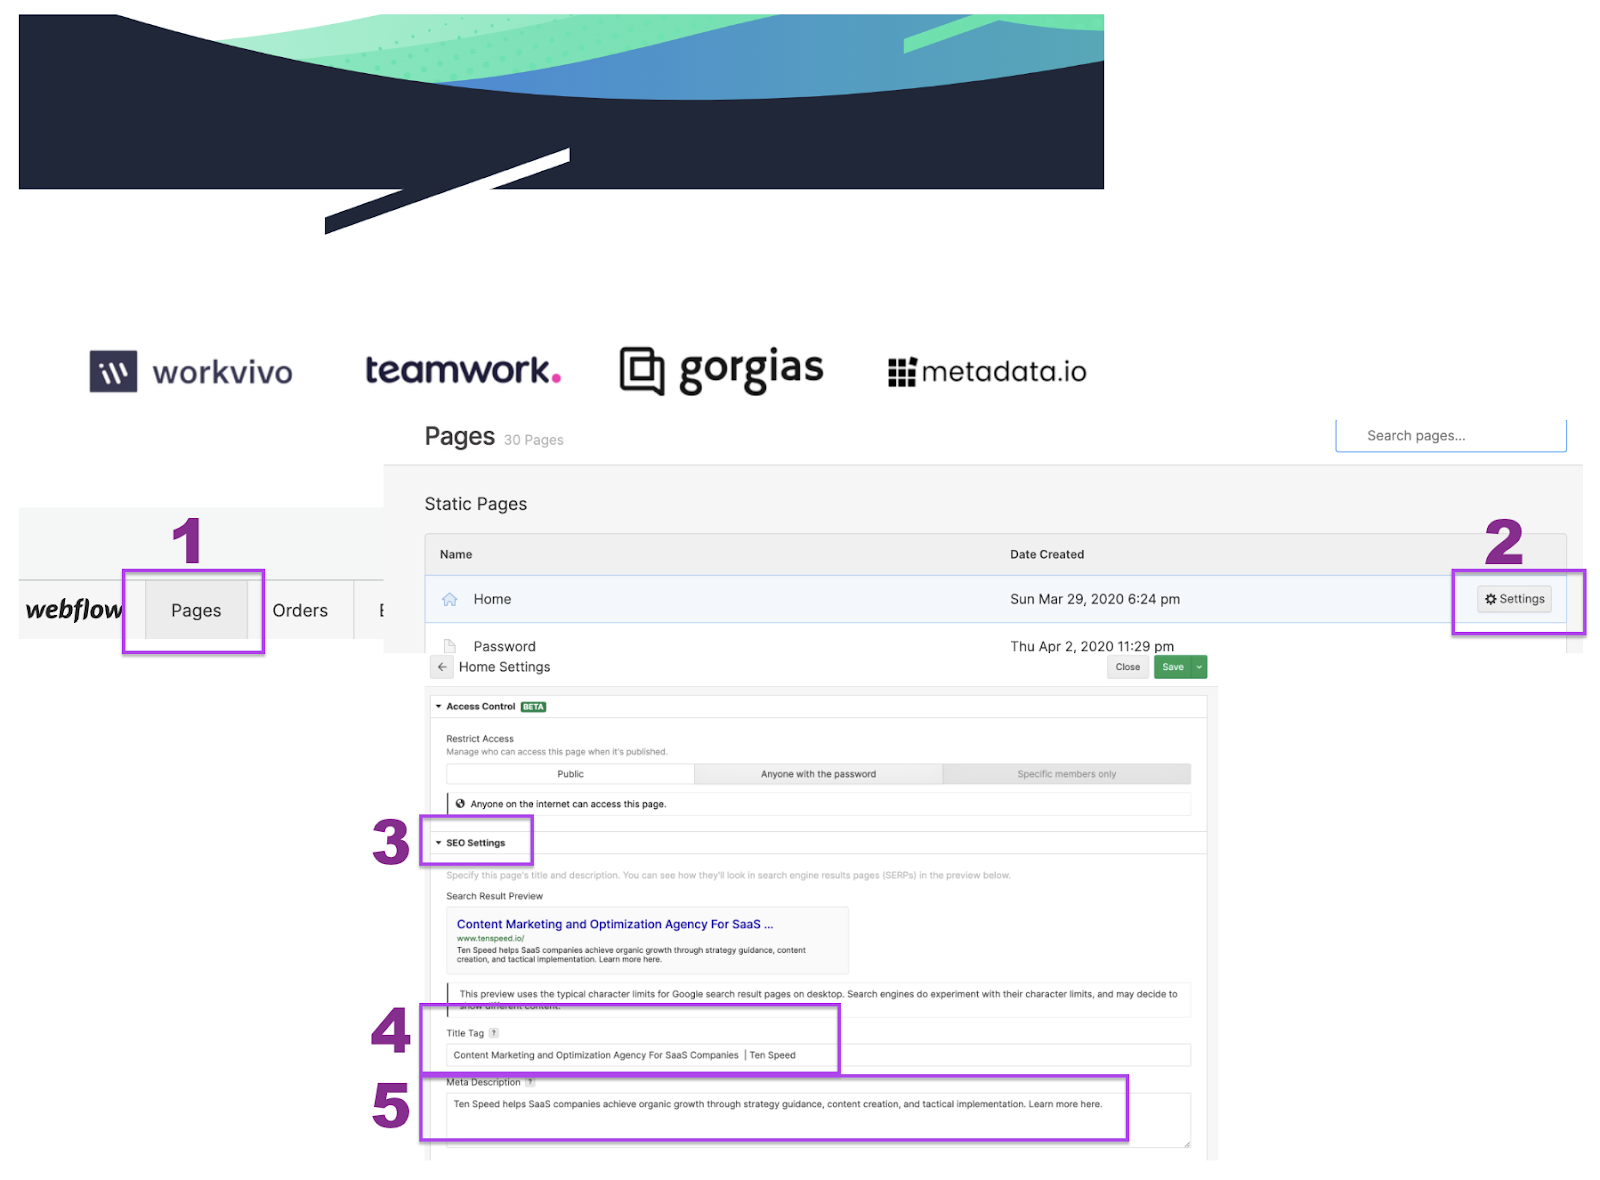
In your editor, you’ll find these fields from the navigation at the bottom of your screen.
- Select Pages from the bottom editor menu.
- Click the static page you want and click the “settings” button on the right side.
- Find the SEO Settings dropdown.
- Edit the Title Tag.
- Edit the Meta Description to include meta titles and meta tags.
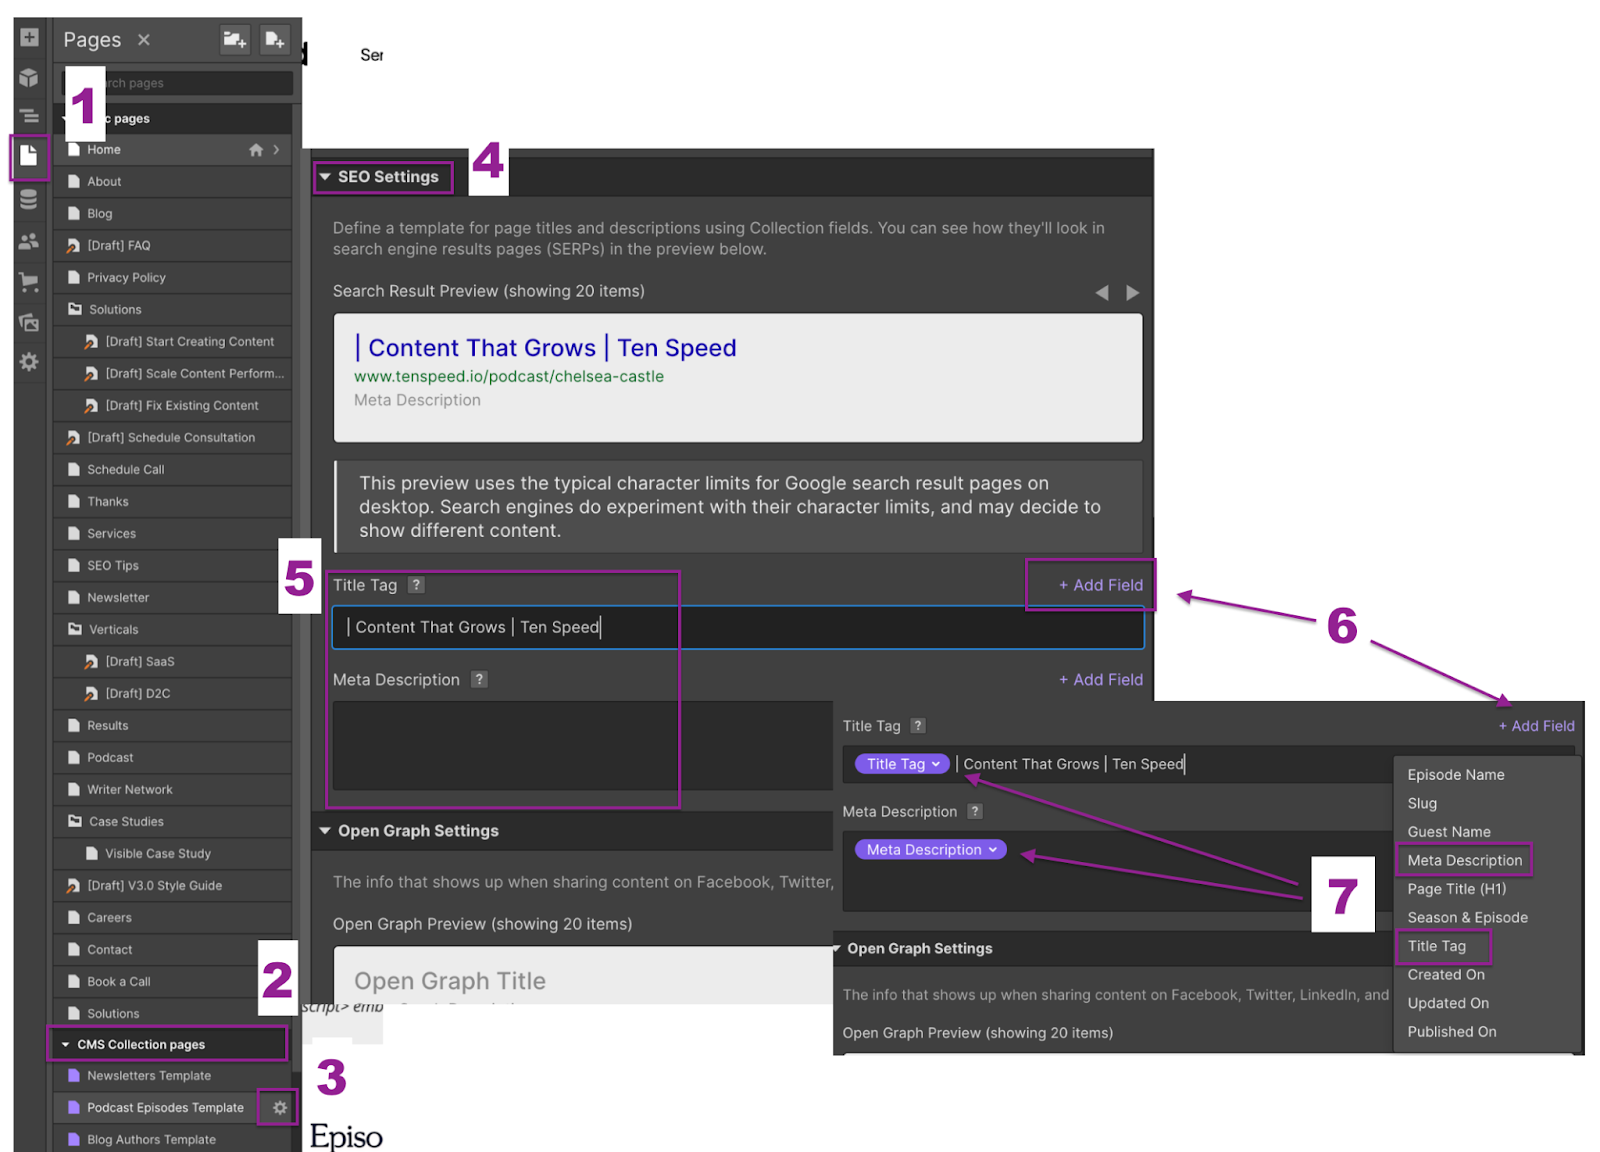
Webflow lets you create CMS Collection pages, which comes in handy when you want to templatize your content. You can set up and automate title tags and meta descriptions for entire collections. (Keep in mind that this functionality is only available to people with access permission at the designer level.)
- Find the Pages panel on the left navigation bar in the design view.
- Beneath your static pages, find the CMS Collection Pages and your collection templates.
- Hover over the template you’d like to change and click the cog icon.
- Navigate to the SEO Settings drop-down.
- Enter universal title tags and meta descriptions across that collection.
- Use dynamic fields to fill in data from the individual pages (optional).
- Choose the dynamic meta title tag and meta description fields to pull in here.
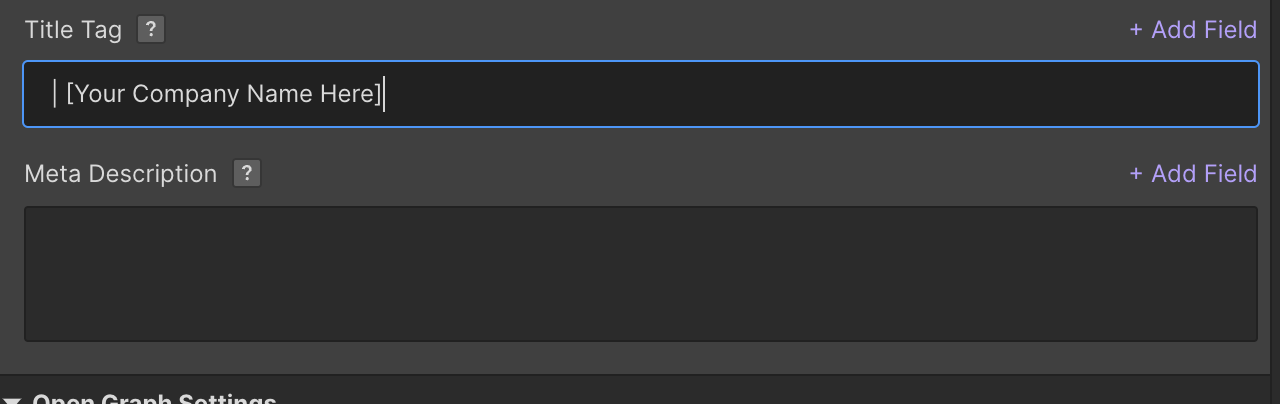
Important note: Whatever field or text you enter in these boxes will be true for every page in that collection.
It’s generally best practice to leave the meta description here blank and to set up your branding for the title tags. That often looks like this:
You might notice that certain individual pages within a collection don’t offer a space to put in the custom title tag or meta description text. Here’s how you can add those fields at the page level:
- Find the CMS panel on the left navigation bar in the design view.
- Hover over the CMS collection and select the settings cog.
- Click the “Add New Field” button.
- Select “Plain Text.”
- Add Title Tag label.
- Repeat steps 3 and 4 and add the meta description label.
Remember to set the dynamic fields to your templates from step 7 of the instructions above.

With these fields added, team members with designer and editor permissions can customize the title tags and meta descriptions no matter which view they’re editing from.
Title tag and meta descriptions tips:
- Keep title tags concise. Lead with important and relevant keyword phrases so the most important words are visible on both desktop and mobile devices.
- We recommend keeping title tags close to 60 characters, but you won’t be penalized if you need to go over for the sake of accuracy.
- Title tags can be a ranking factor. Intent and keywords have a stronger ranking impact, but meta descriptions do not play a direct role in rankings.
- Meta descriptions should hook readers and accurately describe the content.
- Keep the meta description close to 160 characters. Create intrigue and communicate concisely, but don’t sweat it if the character count ends up being 180.
- Google can rewrite both title tags and meta descriptions. If it feels like there is a more accurate title, description, or part of a page to describe it, Google will often change them.
Looking for more highly tactical content marketing advice?
Proper header elements
Creating proper header elements so that you can utilize H1s, H2s, and H3s is vital to your pages' structure and branding.
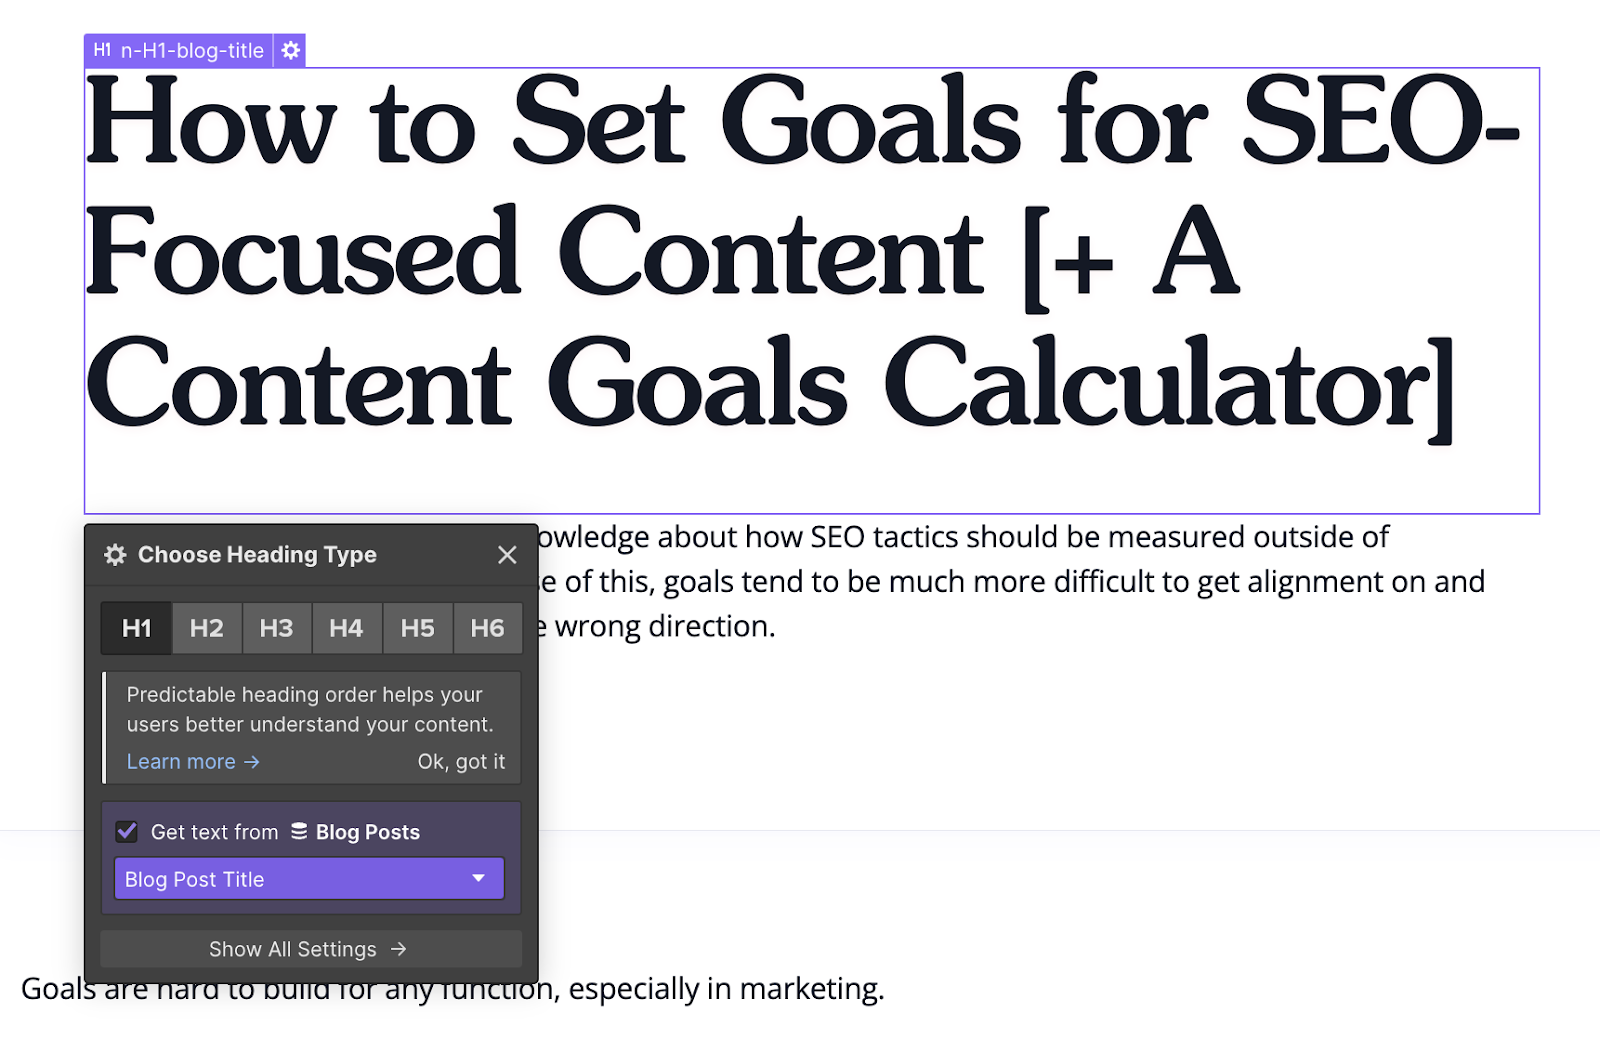
Thankfully, in Webflow, selecting the headers that you’d like to use is fairly straightforward.
In the designer, you can add a header from the “add element section,” or you can double-click on something already labeled a header and a pop-up lets you choose which header option you want to use.
When you’re in editor mode in the CMS, you can copy and paste headers from a Google Doc, and they’ll show up already appropriately tagged with the proper header formatting.
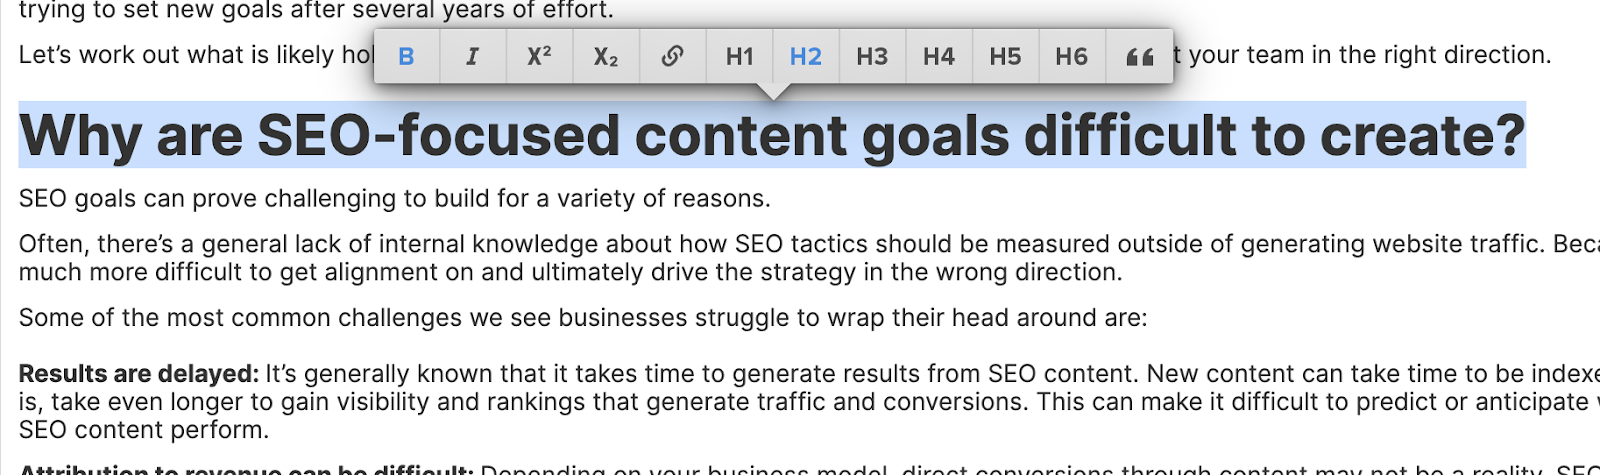
You can also highlight any text you want and Webflow will automatically allow you to transform the text — be it into a header, a quote box, a hyperlink, or another element.
Header SEO tips:
- The text in headers plays a significant role in SEO. Including keywords or variations of important phrases in your headers communicates what readers will find in the following body paragraph, but don’t sacrifice readability for keyword stuffing.
- Headers should follow a hierarchical structure. Every page typically has one H1 at the very top, H2s would then be your next level of headers, H3s for any listed headers that belong under an H2, and so on.
- Headers help land featured snippets. Check out the formatting below to see how you can better format your headers.

Images and alt text
The alt text (or alt tags) you add to the images on your website have two main functions:
- Adding accessibility so that people who use screen readers can have your images described to them
- Allowing Google to place the image in context within the entire page, ranking your image and pages on the SERP based on that description
In Webflow, there are several ways to make sure all of your images are properly labeled, giving your audience and search engines all the information they need.
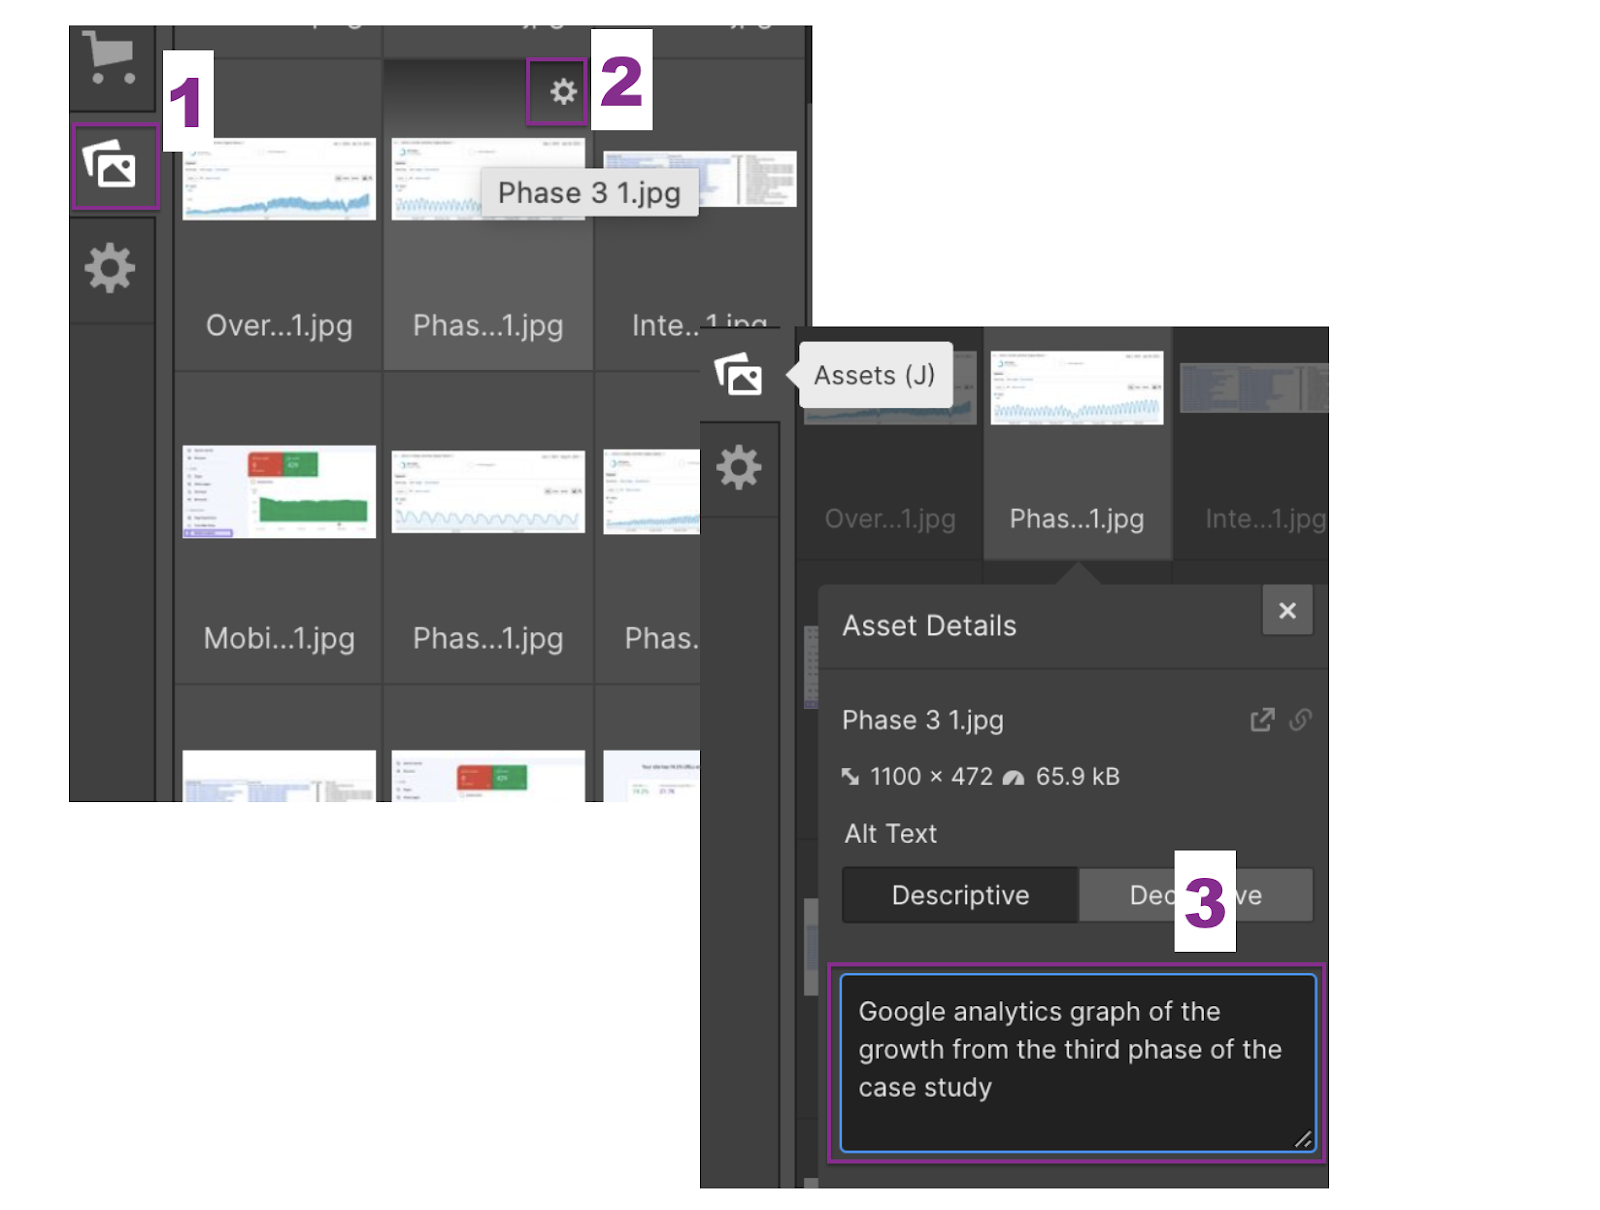
To apply alt text to each image in the assets panel:
- Select the “Assets” tab on the left-hand navigation bar.
- Select the cog in the top right corner of the image of your choice.
- Type in a description of what the image shows.
For images on your pages or in your articles, you can also add or edit alt text by:
- Clicking on the image and you’ll see a toolbar show up
- Selecting the wrench symbol on the right
- Entering your descriptive text
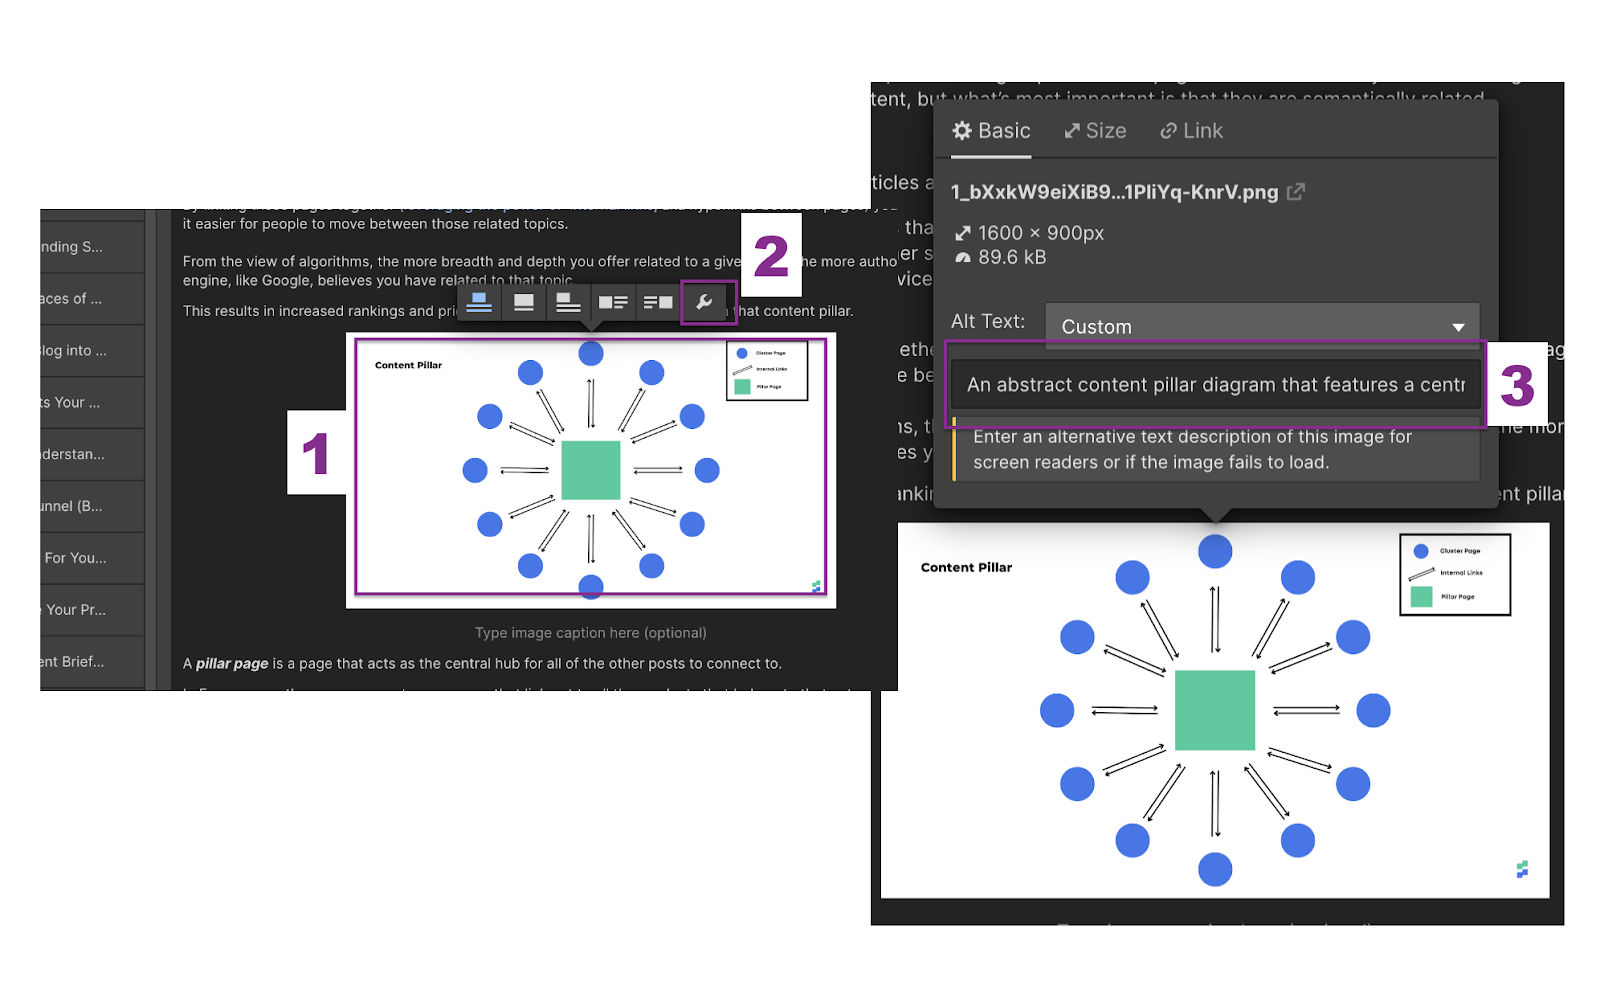
Image alt text tips:
- Work in your keyword phrase with contextual intent. Accurate descriptions help put your image on the SERPs.
- Don’t abuse alt text. Because alt text is used by people who need screen readers, avoid spammy tactics like jamming all your keywords into that description box. Not cool.
URL structures
Defining your URL structure is important for everyone involved with your website. Your SEO strategy will thank you.
A solid URL structure:
- Makes your site easier to navigate
- Provides an easy way to quantify data across subfolders of your website rather than by only individual URLs
- Allows you to incorporate specific CSS themes so that posts that include “/blog” are stylized differently than URLs that include “/product”
- Documents your keyword phrase or the topic of that page for the visitors and future SEO managers
- Helps rank your page or content on Google
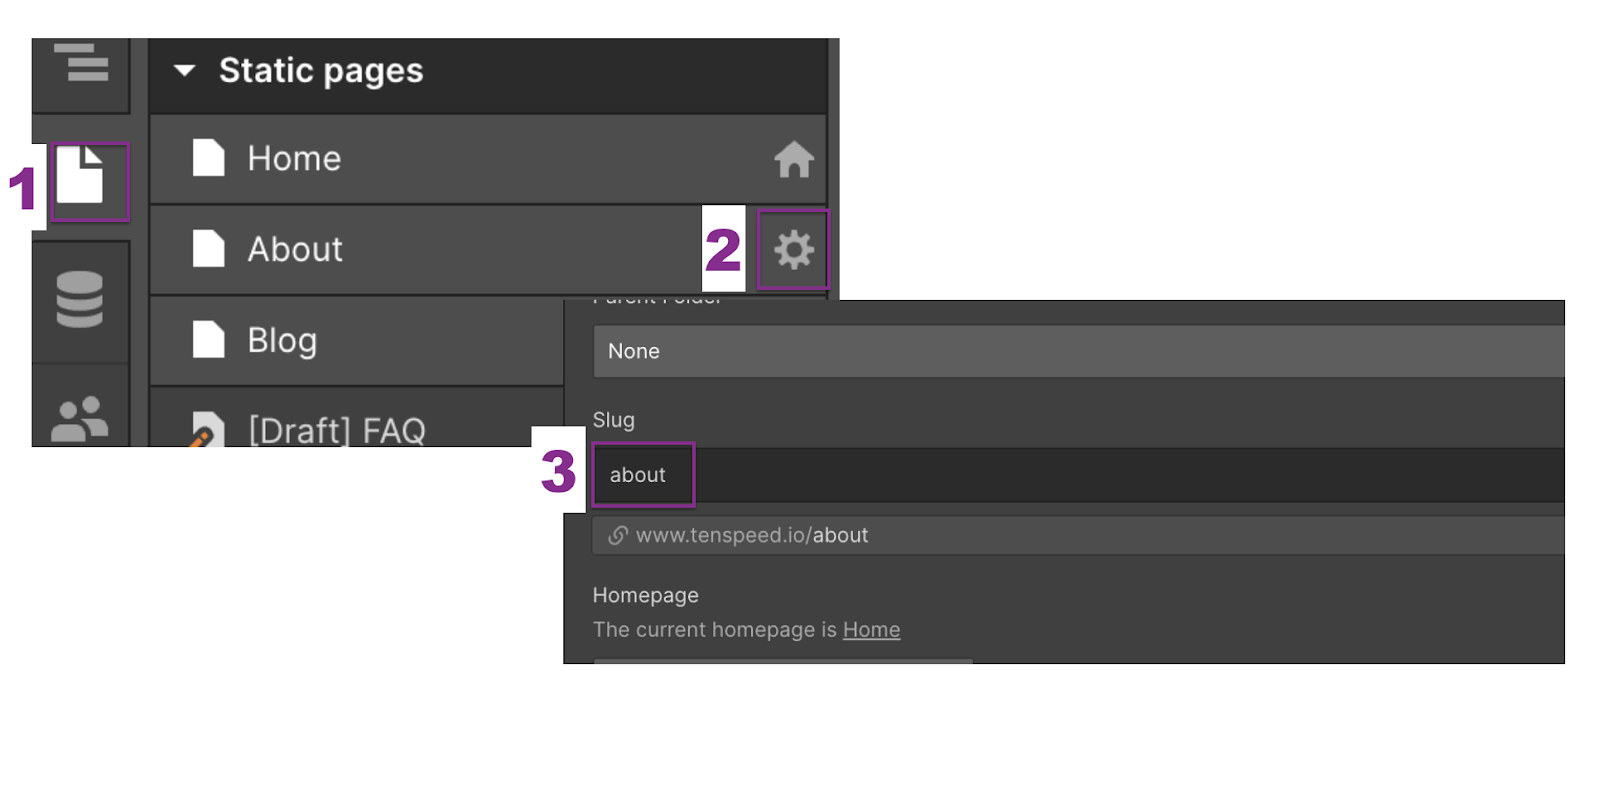
For the basic URL of a page, you’re going to:
- Find the Pages panel on the left navigation bar in the design view.
- Hover over the page you’d like to modify the URL for and select the cog.
- Enter a concise slug.
You can also add the slug to a subfolder for a collection, such as
yourdomainnamehere.com/subfolder-name/enter-your-keyword
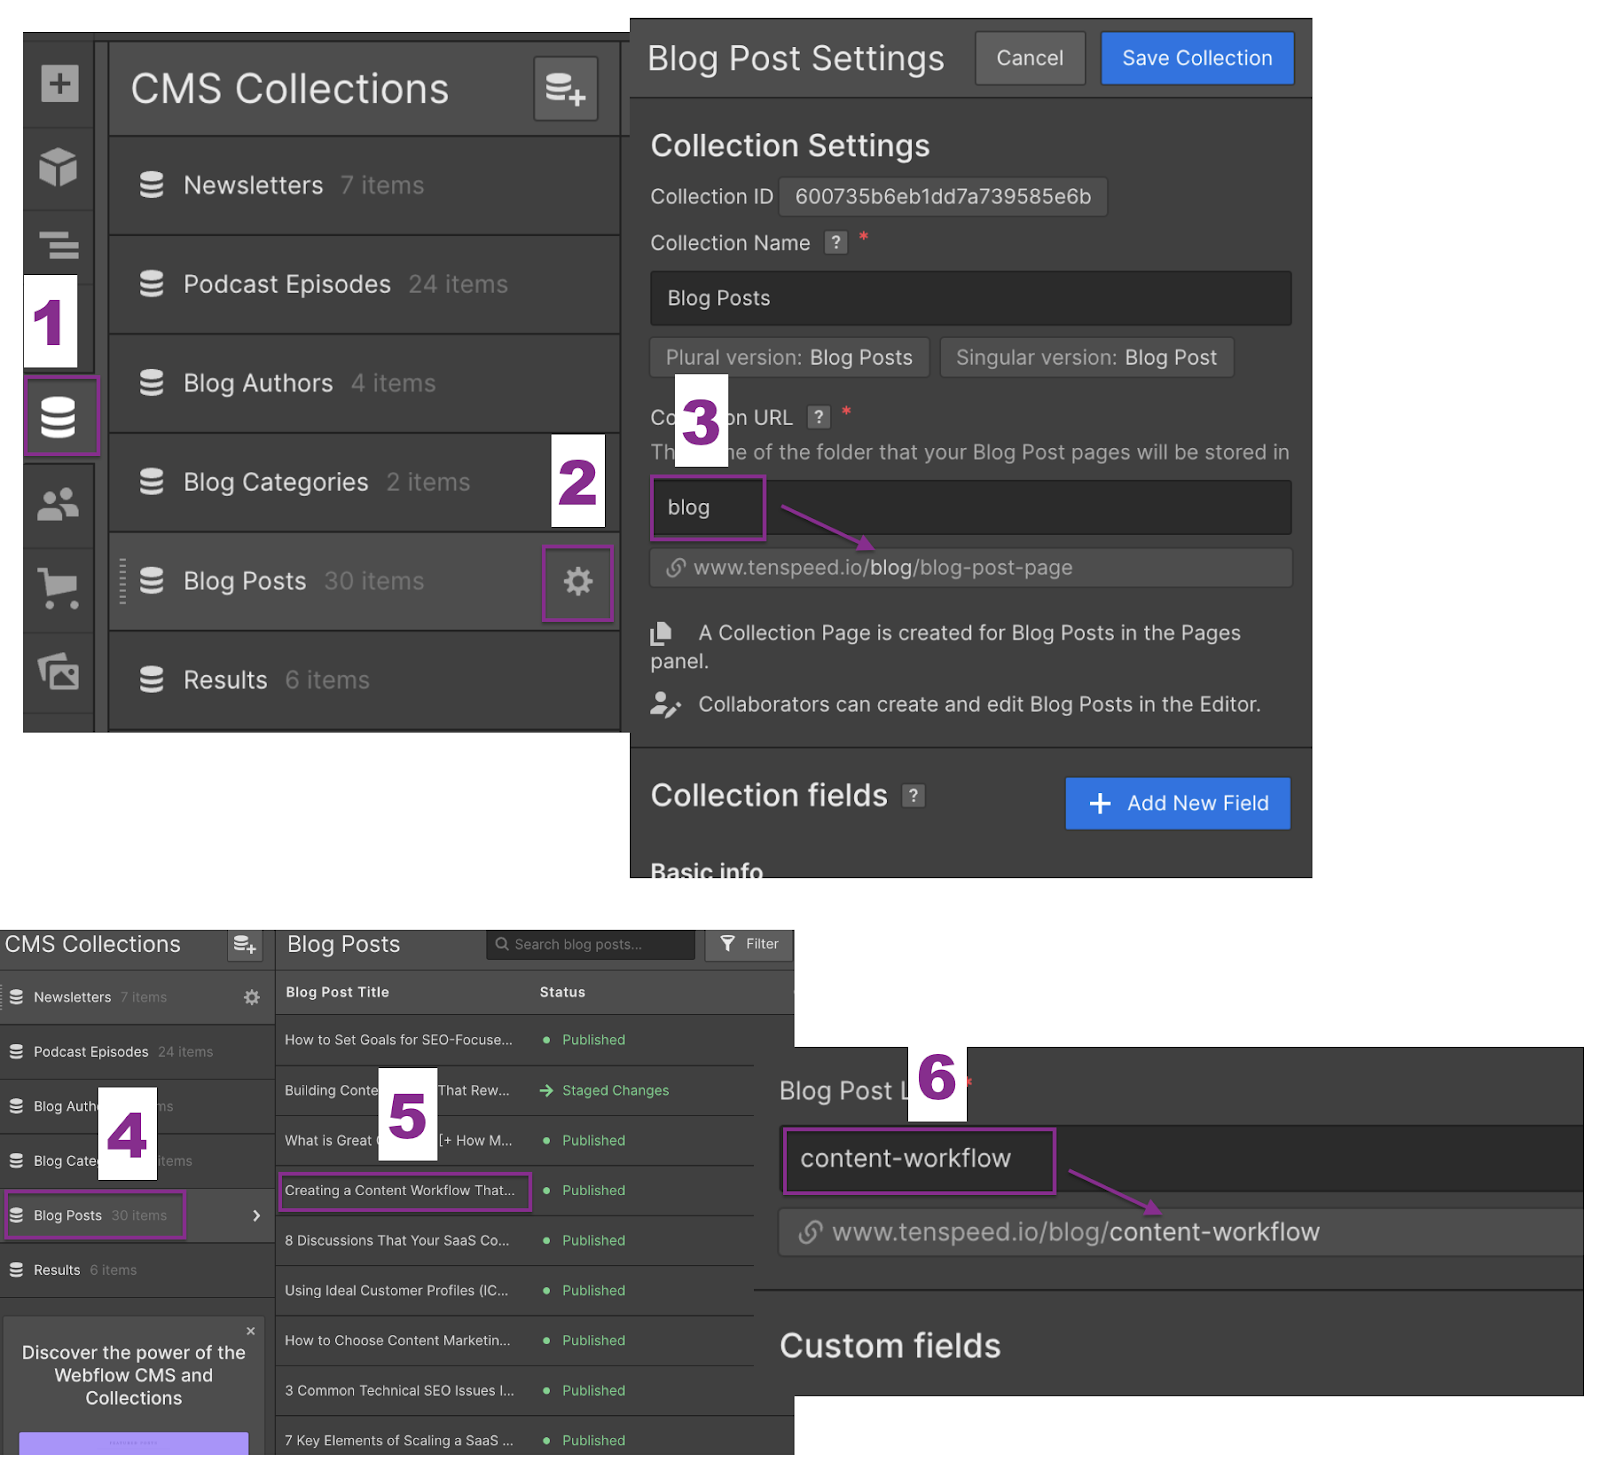
You’ll need to create a CMS collection to establish that parent-to-child relationship of the website structure by:
- Finding the CMS panel on the left navigation bar in the design view
- Hovering over an existing CMS collection or create a new one and select the cog
- Entering a collection URL that’ll act as the subfolder name
From there, you can create or modify the URL slugs for the individual pages in those collections by:
- Selecting the collection from the nav bar
- Creating or selecting the individual page you’d like to create the URL slug for
- Creating a slug that includes the keyword with hyphens between words
URL tips for SEO:
- URL slugs are a ranking factor. Matching intent or using the keyword in a brief description makes for the best URL.
- Avoid numbers in URL slugs. Avoid numbers, especially dates or the number of things in a list. Otherwise, you’ll likely have to start using redirects after you update the content.
Creating a table of contents at the top of your blog posts

Creating navigation jump links so that readers can find the topic they want to learn about faster is great for UX — which means great for SEO. In Webflow, it’s a bit of a manual process, so follow along.
Creating this table requires taking advantage of the custom code feature, which means it’s helpful to have a basic working understanding of HTML.
We’ll start by creating the table of contents at the top. What you’re seeing below is the HTML code that you can copy into another page, modify, and then paste into your tag wherever you want the table to exist.
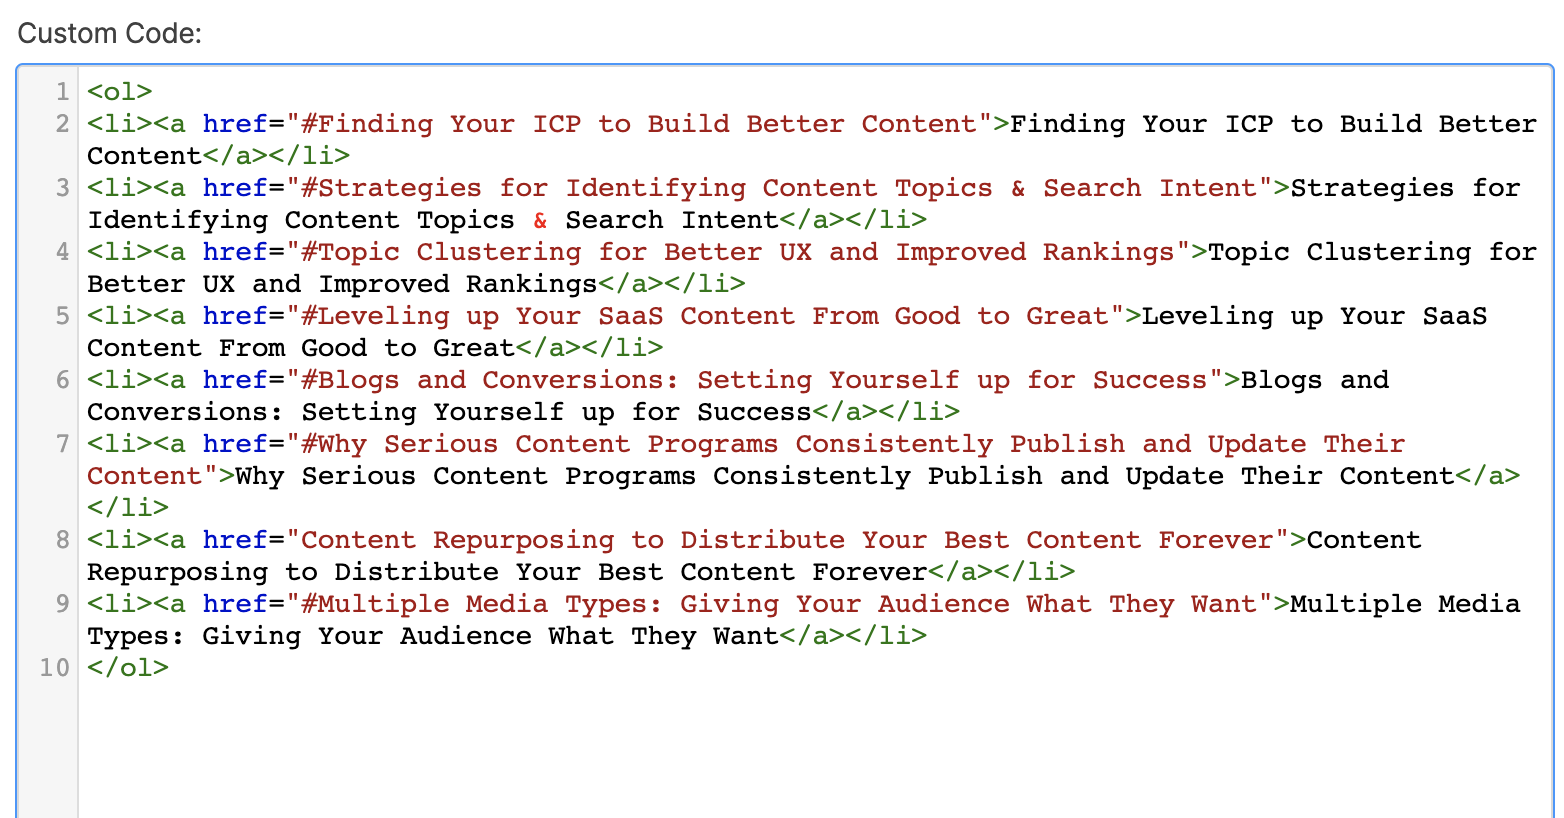
The <li> elements represent each jump link in your list. You’ll have as many of these as you need, but we tend to default to our <h2> headers.
The tag phrase will be the phrase shared between that individual list item and the header you choose to have the link jump to.
Your table of contents in a list format will require you to enter the following (if you want a numbered list):
<ol>
<li><a href="#[tag phrase]">[phrase you want displayed on the page that describes where they’ll go when they click these words]</a></li>
<li><a href="#[tag phrase]">[phrase you want displayed on the page that describes where they’ll go when they click these words]</a></li>
<li><a href="#[tag phrase]">[phrase you want displayed on the page that describes where they’ll go when they click these words]</a></li>
</ol>
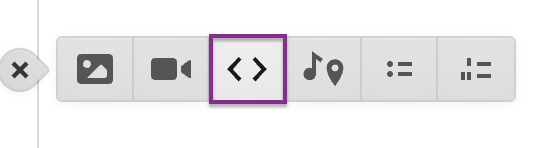
After creating that code, tag each of your H2s with the exact phrase that matches its link from the table of contents. To do this, you’ll need to be in the custom code editor, not the block editor.
The basic code will look like this:
<h2 id="[tag phrase]">[Enter the text you want to display as your h2 here]</h2>
From the example table of contents image above, this is the first H2:

Input each header like the above and you’ll have yourself a blog that visitors can quickly navigate.
Pro tip: If you're proficient with JavaScript, there are more automated ways to produce a table of contents on your blog. Eric Doty from Dock shared how previous devs helped build them using Finsweet's very awesome resources for Webflow.
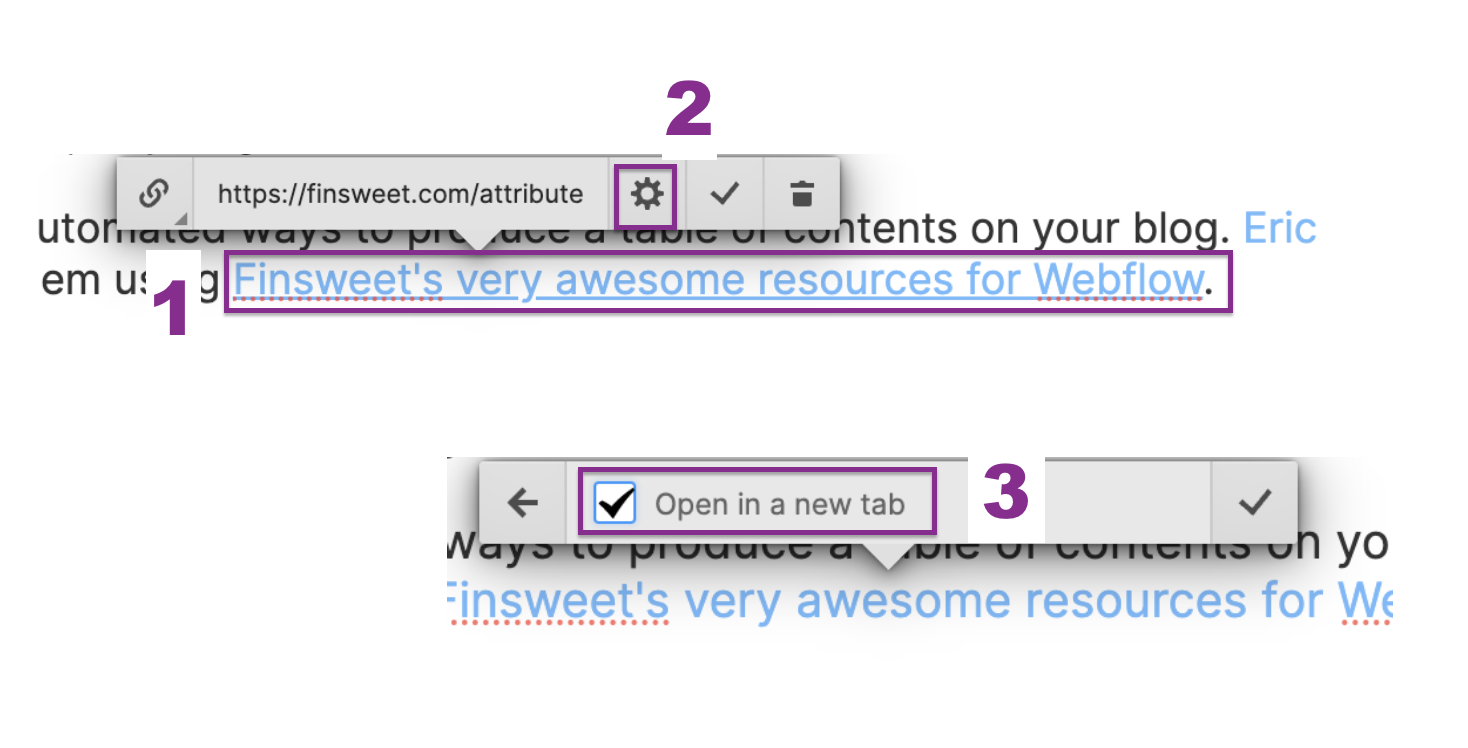
Setting link clicks to open in another tab
In many situations, content marketers want to encourage people to explore all of their content without making them leave the original piece they were looking for. In Webflow, you can set up links to open in a new tab with just a few clicks.
To do so, you’ll:
- Click on a link inside the editor.
- Once the link toolbar shows up, select the gear (settings) button.
- Check the box to have that link open in a new tab.
Webflow and technical SEO basics & best practices
Technical SEO is simplified when using Webflow, but for the best results, you’ll want to make sure you’re following best practices.
A few key terms to know before we dig in:
- Robots.txt file instructs search engine bots how to crawl your website. By altering this, you can change whether or not your page is indexed.
- 301 redirects permanently redirect one URL to a new one.
- XML sitemaps are structured lists of every page on your website.
- Rel attributes, like canonical tags and nofollow tags, are HTML link tags that define how two pages should be connected.
- Core Web Vitals include several key elements of a website’s performance: loading speed, interactivity, and visual stability.
De-indexing your Webflow pages from Google’s search results
There will be times when you’d like a page to be de-indexed.
You might have a page that’s not ready or that you never intend to be public-facing. You also might want to prevent two similar pages from internally competing with one another for a SERP position.
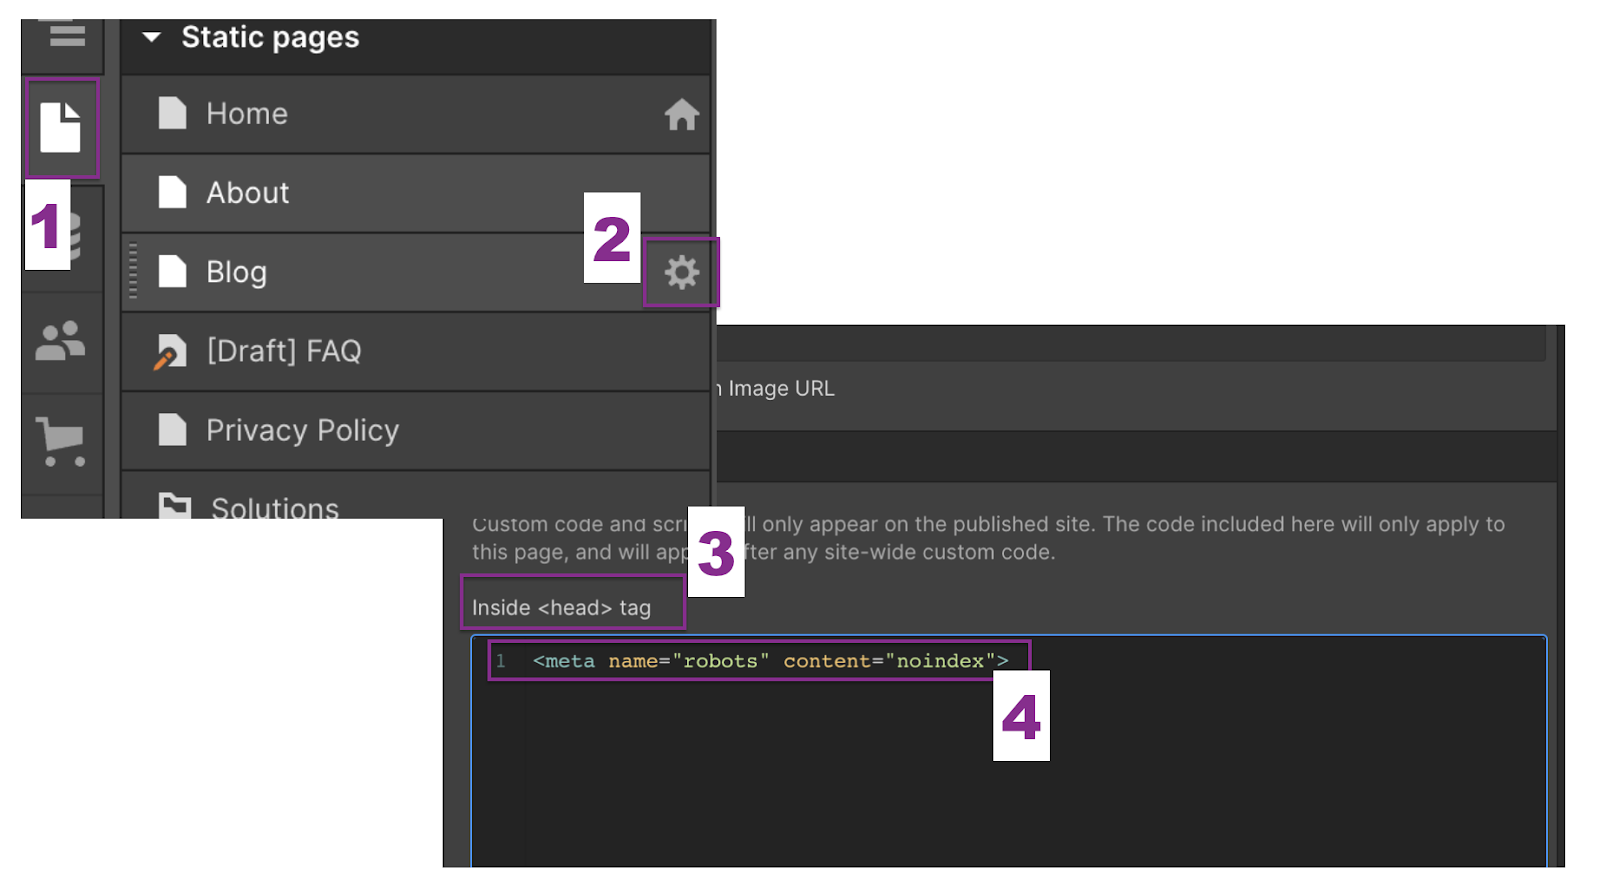
Whatever the case, Webflow requires a snippet of code to de-index individual pages. This is where robots.txt comes into play. This crucial code tells Google not to index a specific page.
Here’s the code snippet you’ll need: <meta name="robots" content="noindex">
To de-index a page you’ll:
- Find the Pages or CMS panel on the left navigation bar in the design view.
- Select the gear icon over the page you’d like to remove from the index.
- Scroll past all the SEO settings until you reach “Inside <head> tag.”
- Enter the snippet of the code and publish your website again.
Implementing 301 redirects within Webflow
301 redirects are necessary for several reasons — and they’re extraordinarily helpful in SEO. You might implement a 301 redirect if:
- You recently consolidated content on four different pages covering similar topics into the best-performing URL.
- You need to change the URL of a page that is ranking for a keyword you want to continue to rank. A 301 redirect hands over link equity and ranking factors associated with the original URL.
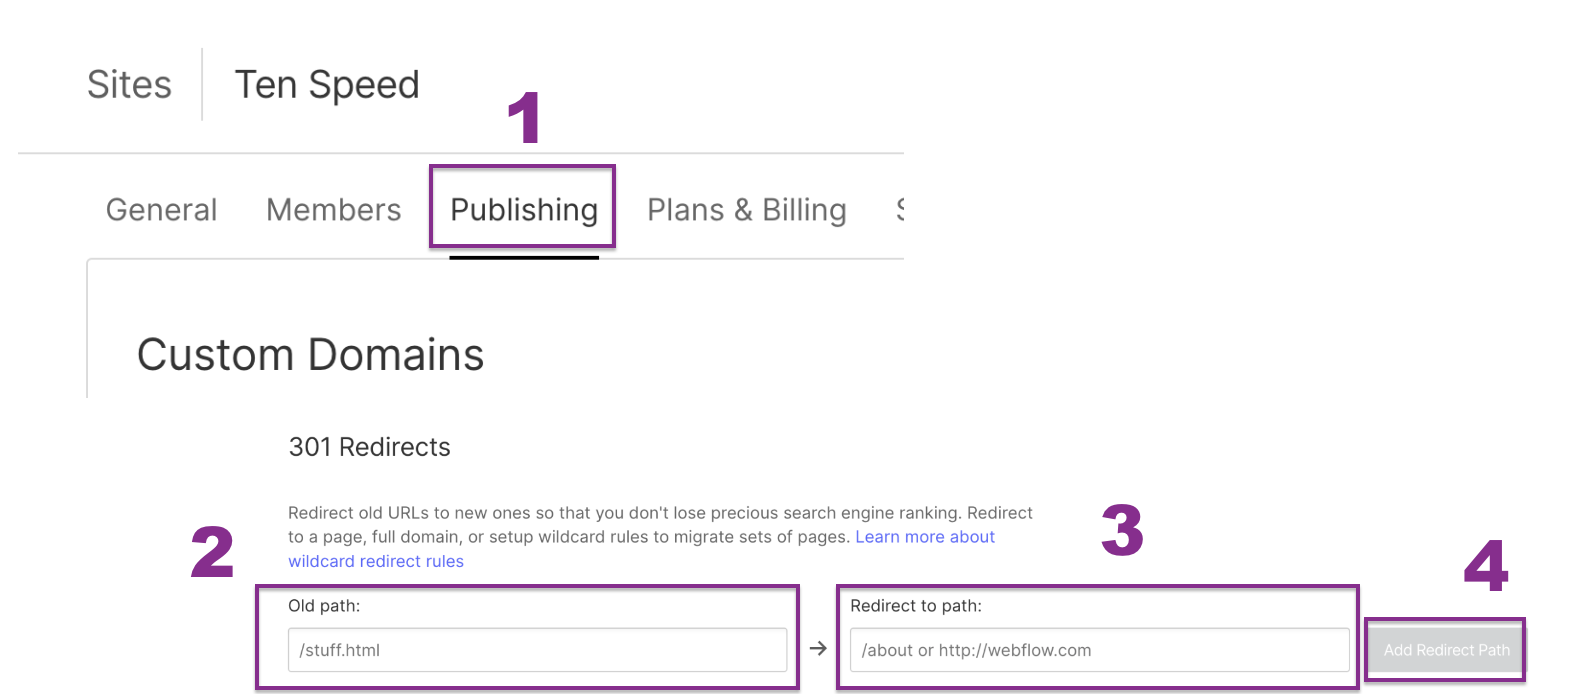
To do this in Webflow, you’ll want to:
- Go to Project settings for your site, select the Publishing tab, scroll to “301 Redirects.”
- Add your old or original URL in the field labeled “Old Path.”
- Add your new URL in the field labeled “Redirect to path:”
- Select the Add Redirect Path and remember to publish.
XML sitemaps
Your sitemap allows you and search engine bots to see all of your existing pages. You can also submit your sitemap to Google Search Console to ensure Google is aware of your most recent URLs.
An auto-generated sitemap will often be more than enough for you or your company’s website.
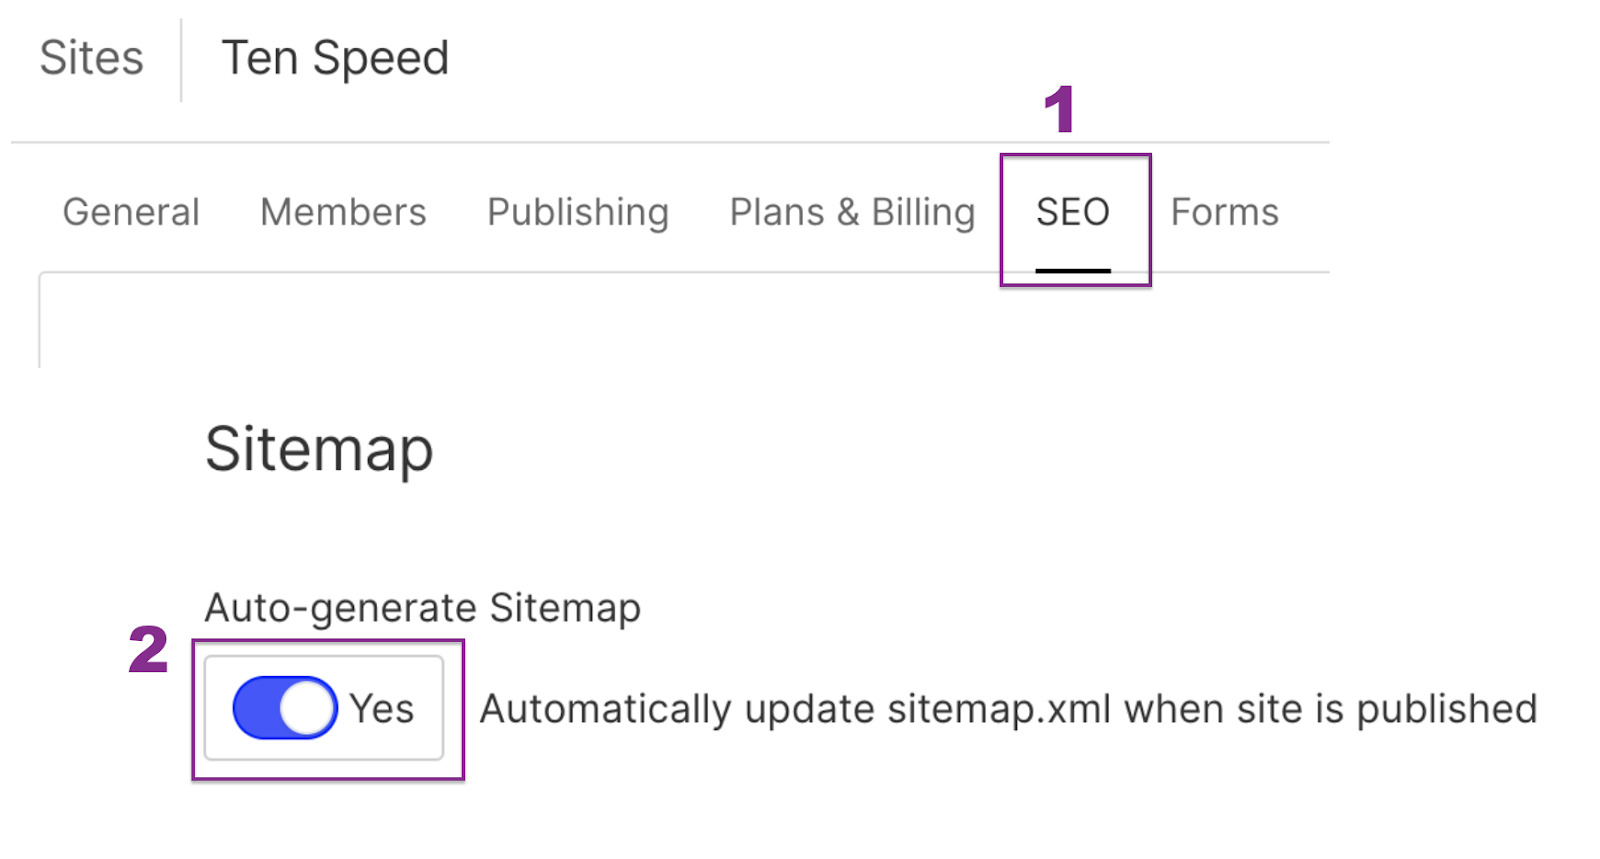
To tell Webflow to auto-generate a sitemap you can:
- Go to Project settings for your site, select the SEO tab, scroll to “Sitemap.”
- Make sure the button under Auto-generate Sitemap is set to “Yes.”
You can see your actual sitemap url by typing in: [yourdomainname].com/sitemap.xml
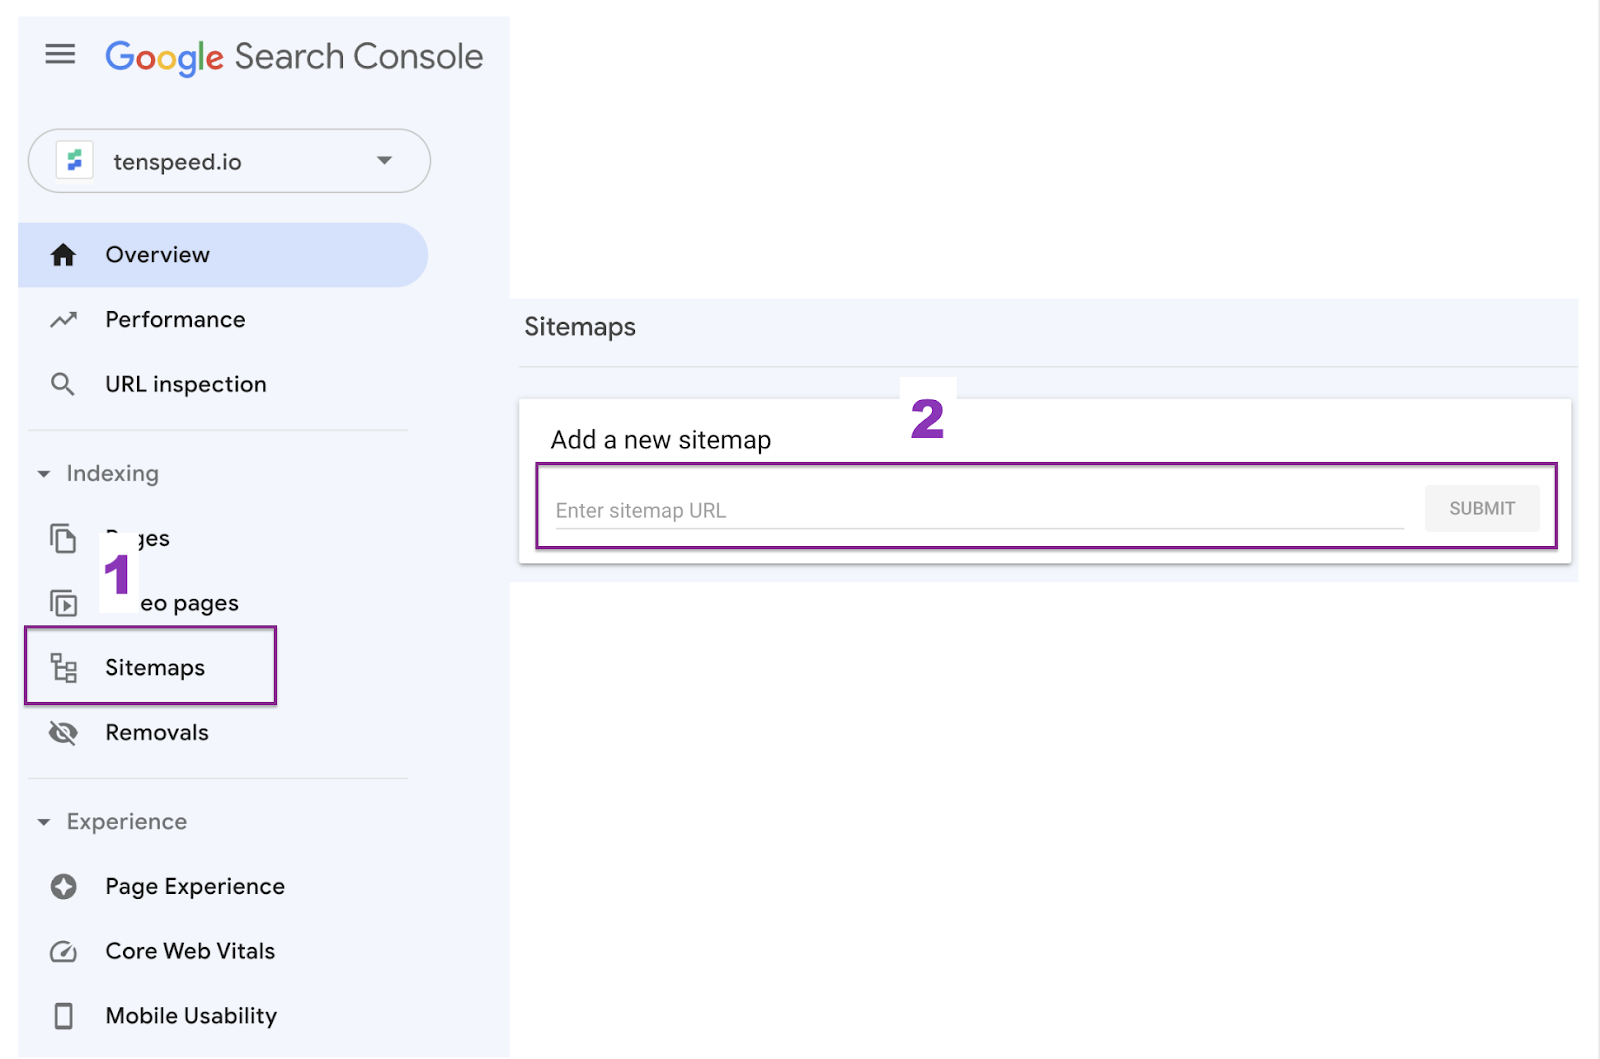
When you log into your Google Search Console, you can submit your sitemap by:
- Finding the Sitemaps tab on the left side nav
- Entering your sitemap URL at the top of the page and submitting
Canonical tags
Canonical tags tell Google which specific URL should be prioritized as the primary or master copy. Most pages simply reference themselves, and that’s the end of the matter.
But sometimes, you’ll have duplicate content on the website. This might happen if you have both the http and https versions of your site live or if you’re targeting multiple language audiences and using hreflangs.
You’ll need to tell a search engine like Google which one to prioritize so that they don’t compete against one another for top spots in SERPs.
If someone distributes one of your blog posts on their website for a backlink, you’d want their URL to have the “rel canonical” tag that points to your original URL. Otherwise, you’d be fighting your own website’s content for a first-position ranking.
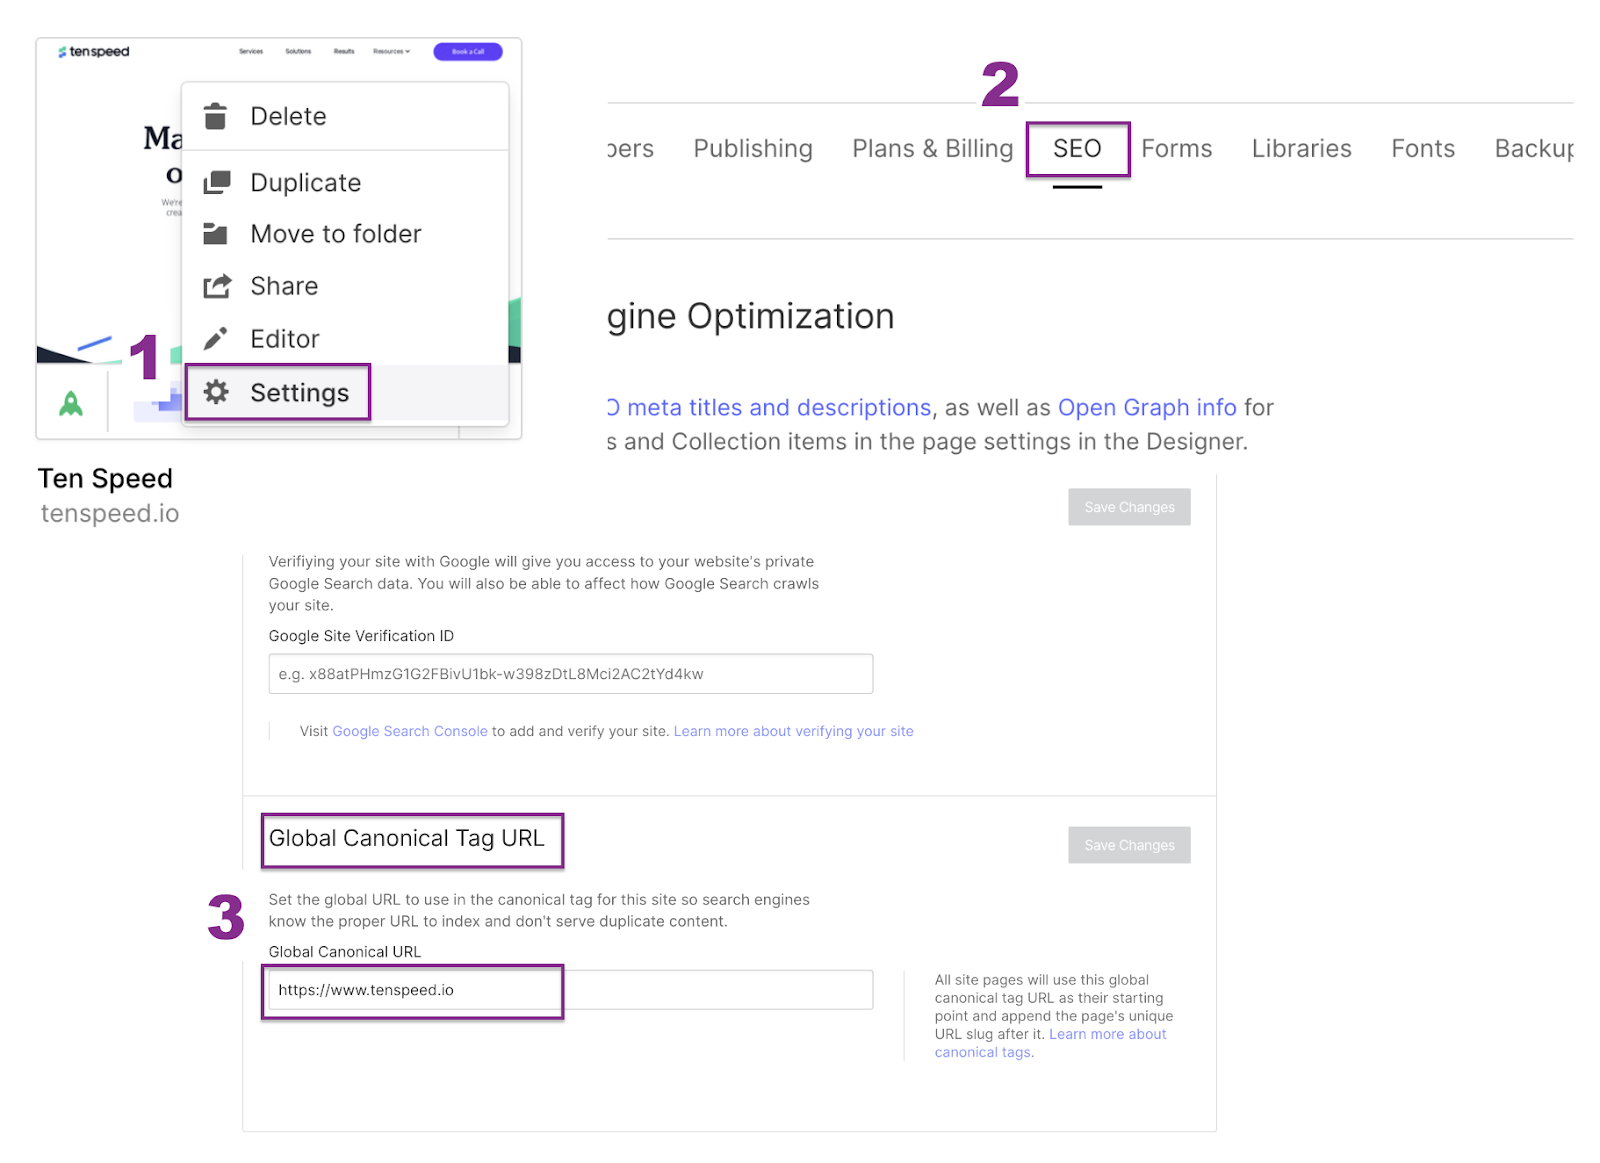
Webflow has a global canonical tag that you can simply toggle on that should do the trick:
- Go to settings for your website.
- Select the SEO tab.
- Scroll down to the Global Canonical Tag URL and enter the full version of your domain URL in that space.
Setting outgoing links to rel=nofollow
You may find it challenging to link to pages where you’d rather not push along link equity to a resource, despite wanting to share it with readers. The simplest way to do this is to use the HTML Embed Code Editor.
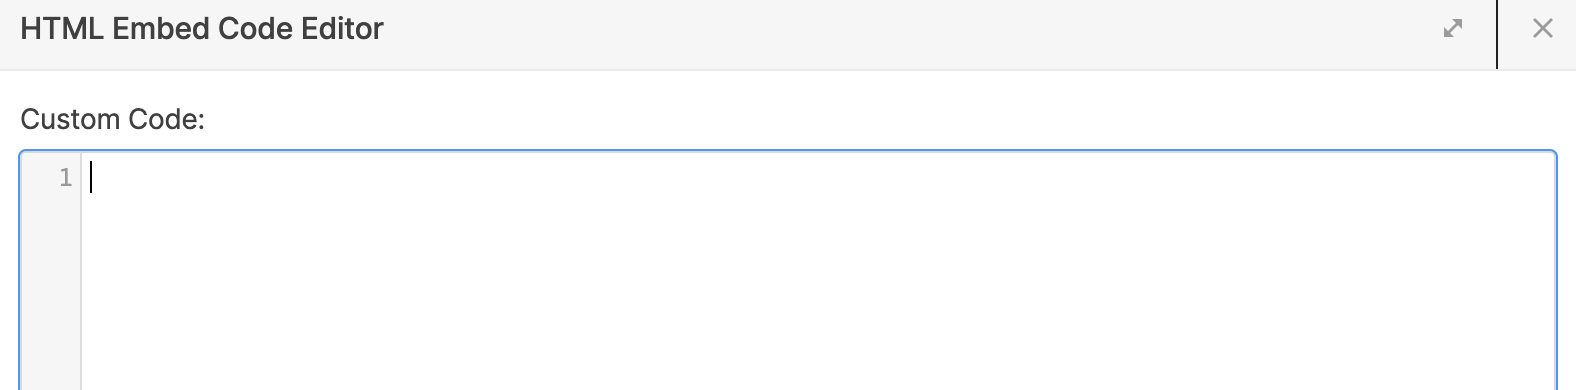
You'll want to enter the common HTML code for a link using the <a hrefs> element and be sure to include the attribute rel=nofollow.
This will work well for something like a standalone list item or header, but if you'd like to add it to anchor text within a paragraph, you’ll include the paragraph text in the custom code editor.

Core Web Vitals (CWVs) tips for speeding up Webflow
The no-code Webflow experience for marketers produces fairly clean code right out of the box. Despite this, there are some recurring problem areas where we’ve figured out some solutions to improve the user experience on mobile and satisfy CWV recommendations.
Faster image and font loading with “preconnect”
Two things will inevitably trouble your Webflow loading speed as it relates to CWVs: the time it takes to load your selected font type, and your images.
Webflow hosts these types of files in several locations and retrieves the desired information as it comes across the needed file in its natural loading process.
Instead of waiting, you can use a few preconnect commands to help the page load the files asynchronously alongside the rest of the page loading.
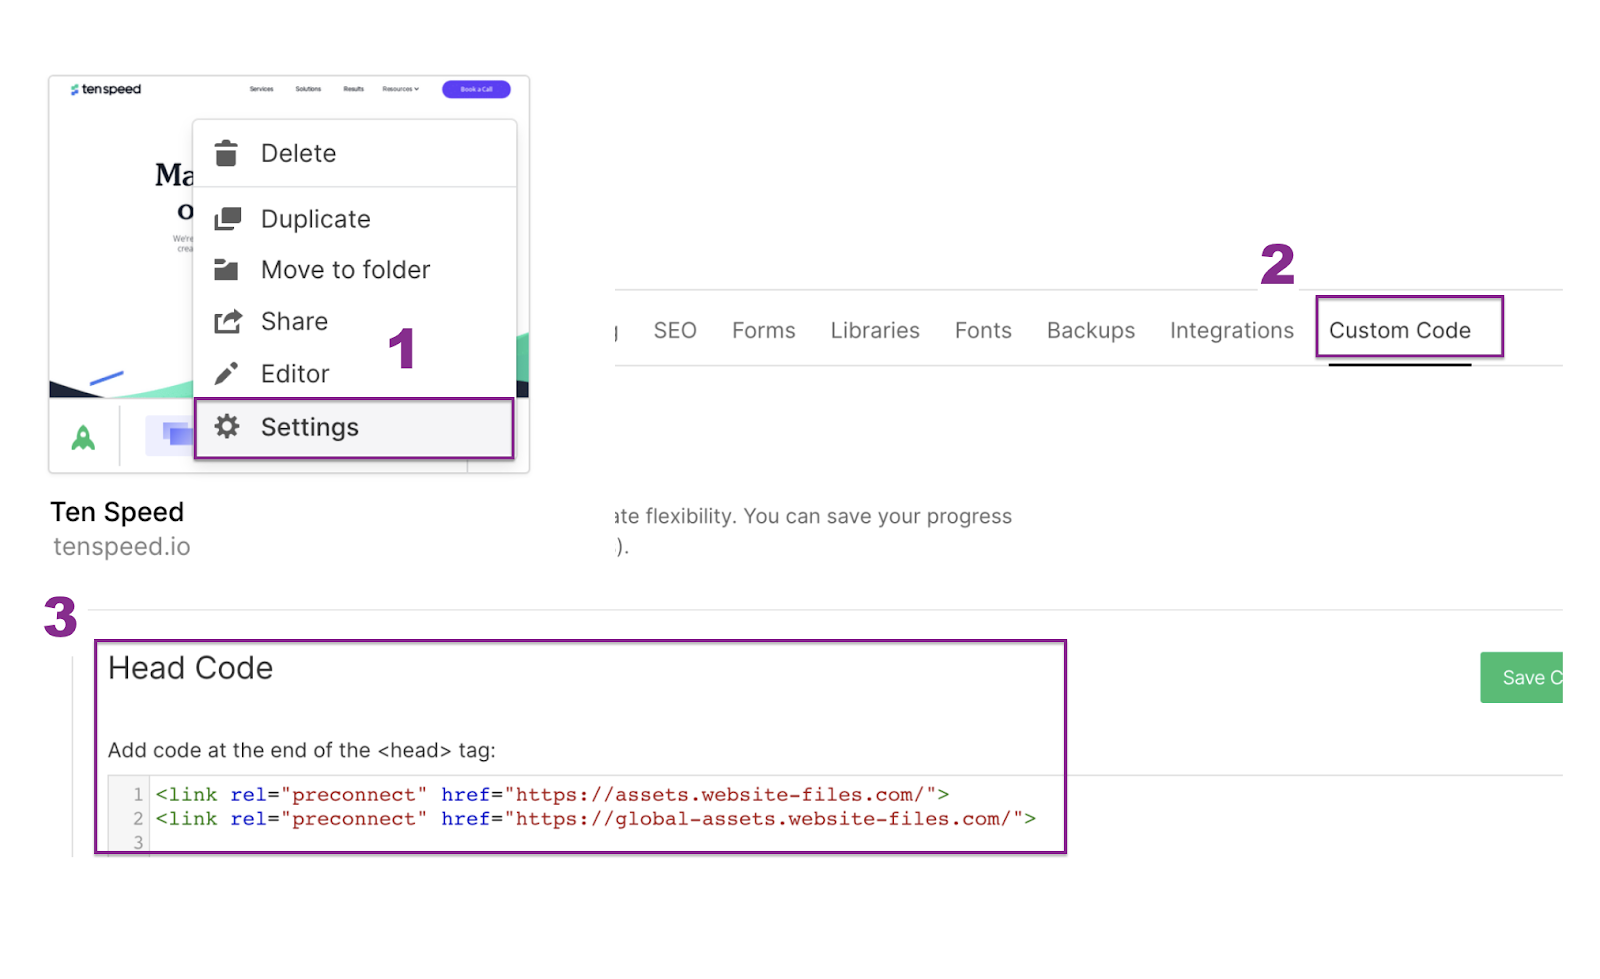
You can place these in the custom head code:
- <link rel="preconnect" href="https://assets.website-files.com/">
- <link rel="preconnect" href="https://global-assets.website-files.com/">
- <link rel="preconnect" href="https://fonts.googleapis.com"
- <link rel="preconnect" href="https://fonts.gstatic.com"
Here’s how you add them to the code:
- Go to settings for your website.
- Select the tab labeled Custom Code.
- In the section labeled Head Code, paste the above links.
*Double-check that these haven’t already been implemented. Webflow will occasionally update this code for you.
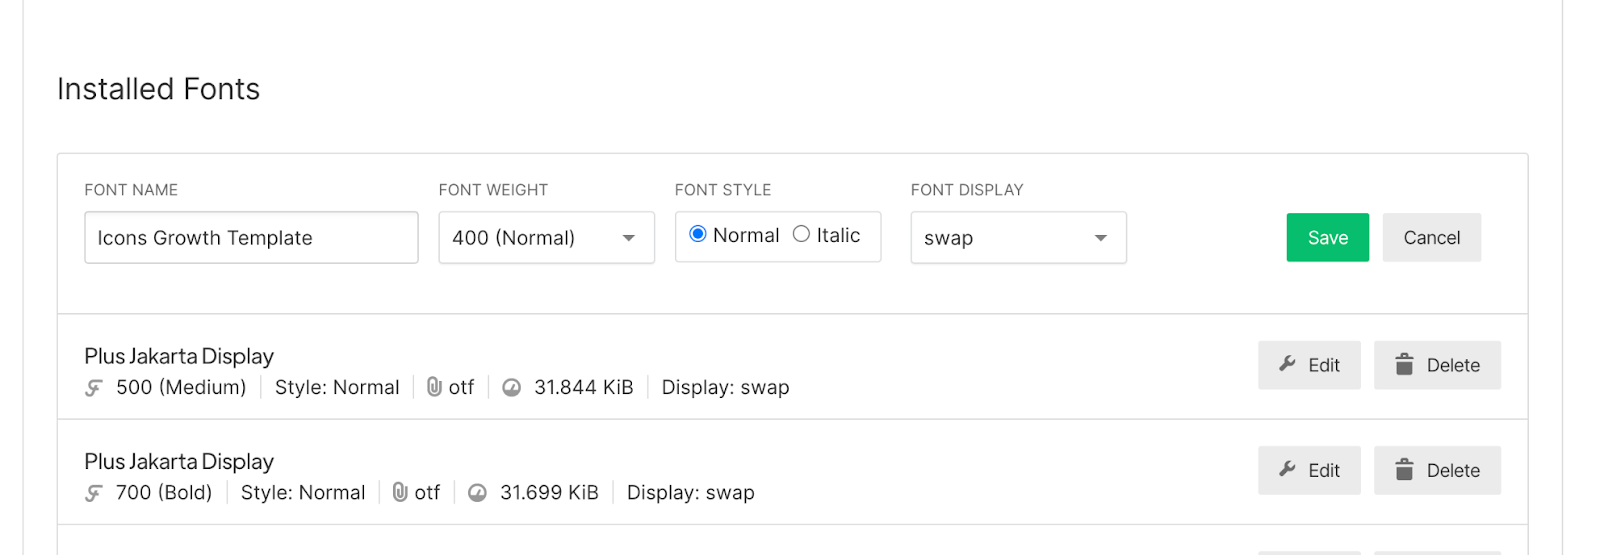
Try setting your fonts to “swap”
In addition to “preconnect,” Webflow recommends selecting your custom text to “Swap” to help your website deliver a preloaded system font immediately while your custom font files are retrieved.
- Go to your website settings.
- Select the tab labeled Fonts.
- For each font, select the Edit button.
- Select swap from the drop-down for “Font Display.”
Be sure to lazy load your images
Webflow is supposed to have “lazy loading” set up for your images out of the gate.
However, if you’ve had a Webflow website for a few years, it’s worth checking to make sure your older images are being served this way.
Keep third-party scripts low and test delaying, deferring, and async loading
You’ll need third-party javascript to collect data from website users. To avoid website performance concerns, the important note here is to always limit the number to exactly what you need.
There are options for delaying, deferring loading, and loading your script async that will speed up loading times or allow you to wait until everything important is loaded to finally run your third-party code.
We recommend starting here to learn more about what these mean for you.
Additionally, Webflow recommends selectively loading different scripts for your mobile and desktop users to improve the loading times of already generally slower mobile experiences.
Pay attention to your animations and triggers
Some Webflow templates come with animations and triggers that create a smooth-looking page.
These can be fun. They can create a truly sharp feel. But be sure to ask yourself two important questions:
- Does this impact the above-the-fold image or text loading time?
- Is this something that customers truly need to experience to trust us?
If your answer to the first question is yes, consider removing that animation to serve content to visitors immediately.
If your answer to the second question is no, make Google happy by removing that fancy animation and helping your CWV scores.
Connecting Google Analytics and Google Search Console
As a marketer, you’re going to want to connect your Google data sources to your Webflow websites in order to show off your incredible SEO results to your executives.
Additionally, Google Search Console will be instrumental in understanding the keywords driving your results and any technical issues your site might be experiencing.
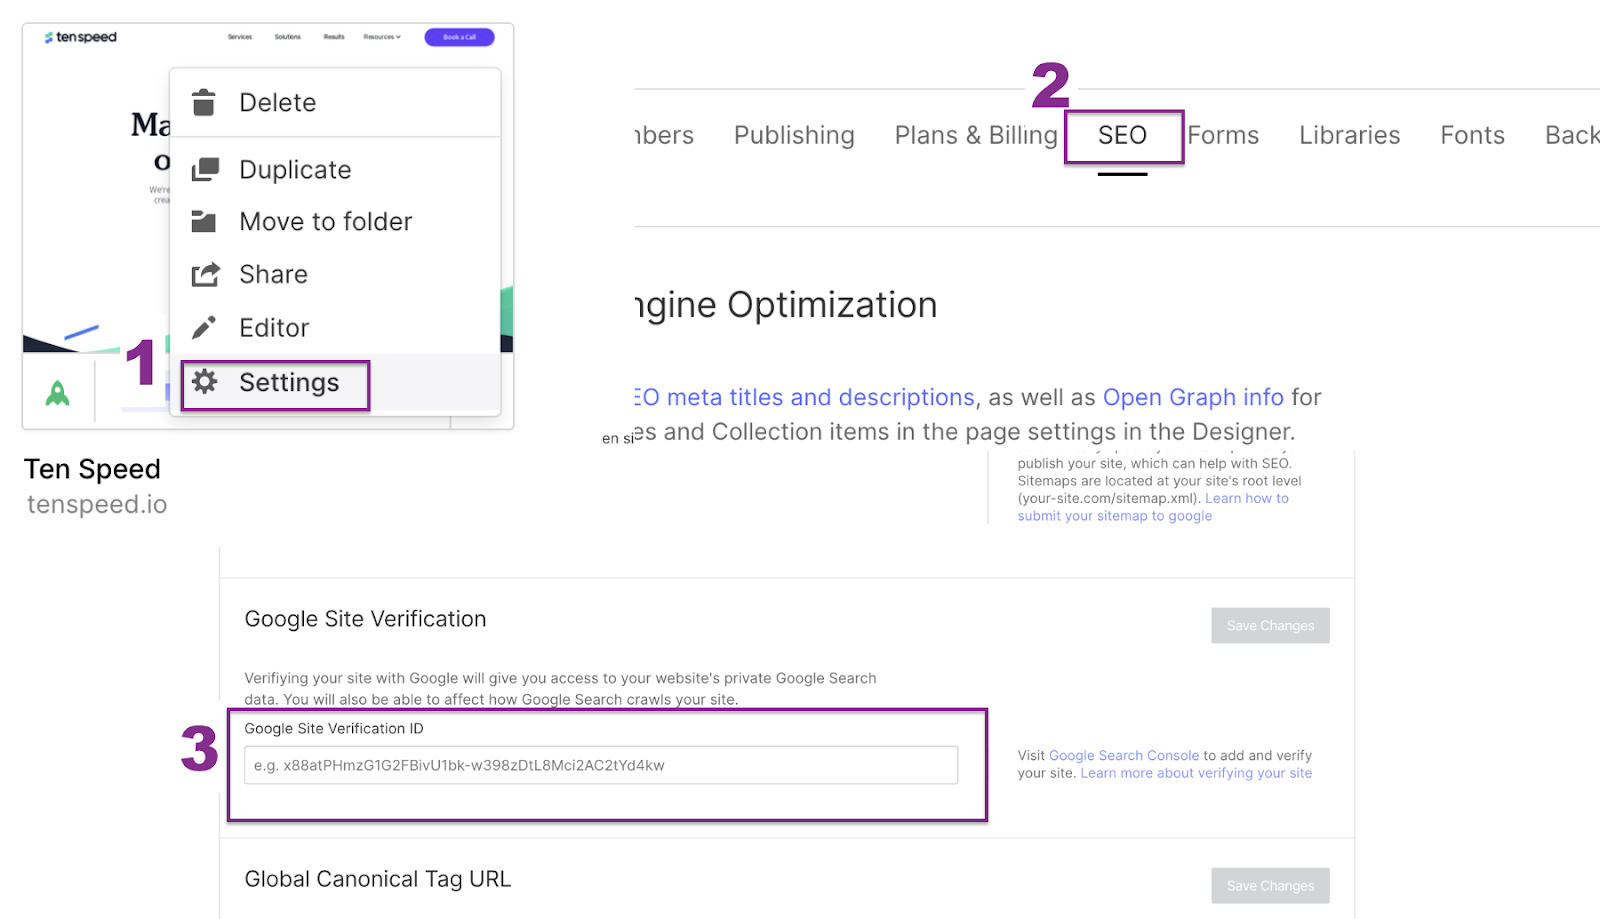
For Google Site Verification with Google Search Console, the process is relatively simple.
- Go to the project settings for your website.
- Select the SEO tab.
- Scroll down to the field for “Google Site Verification” and enter the site verification code.
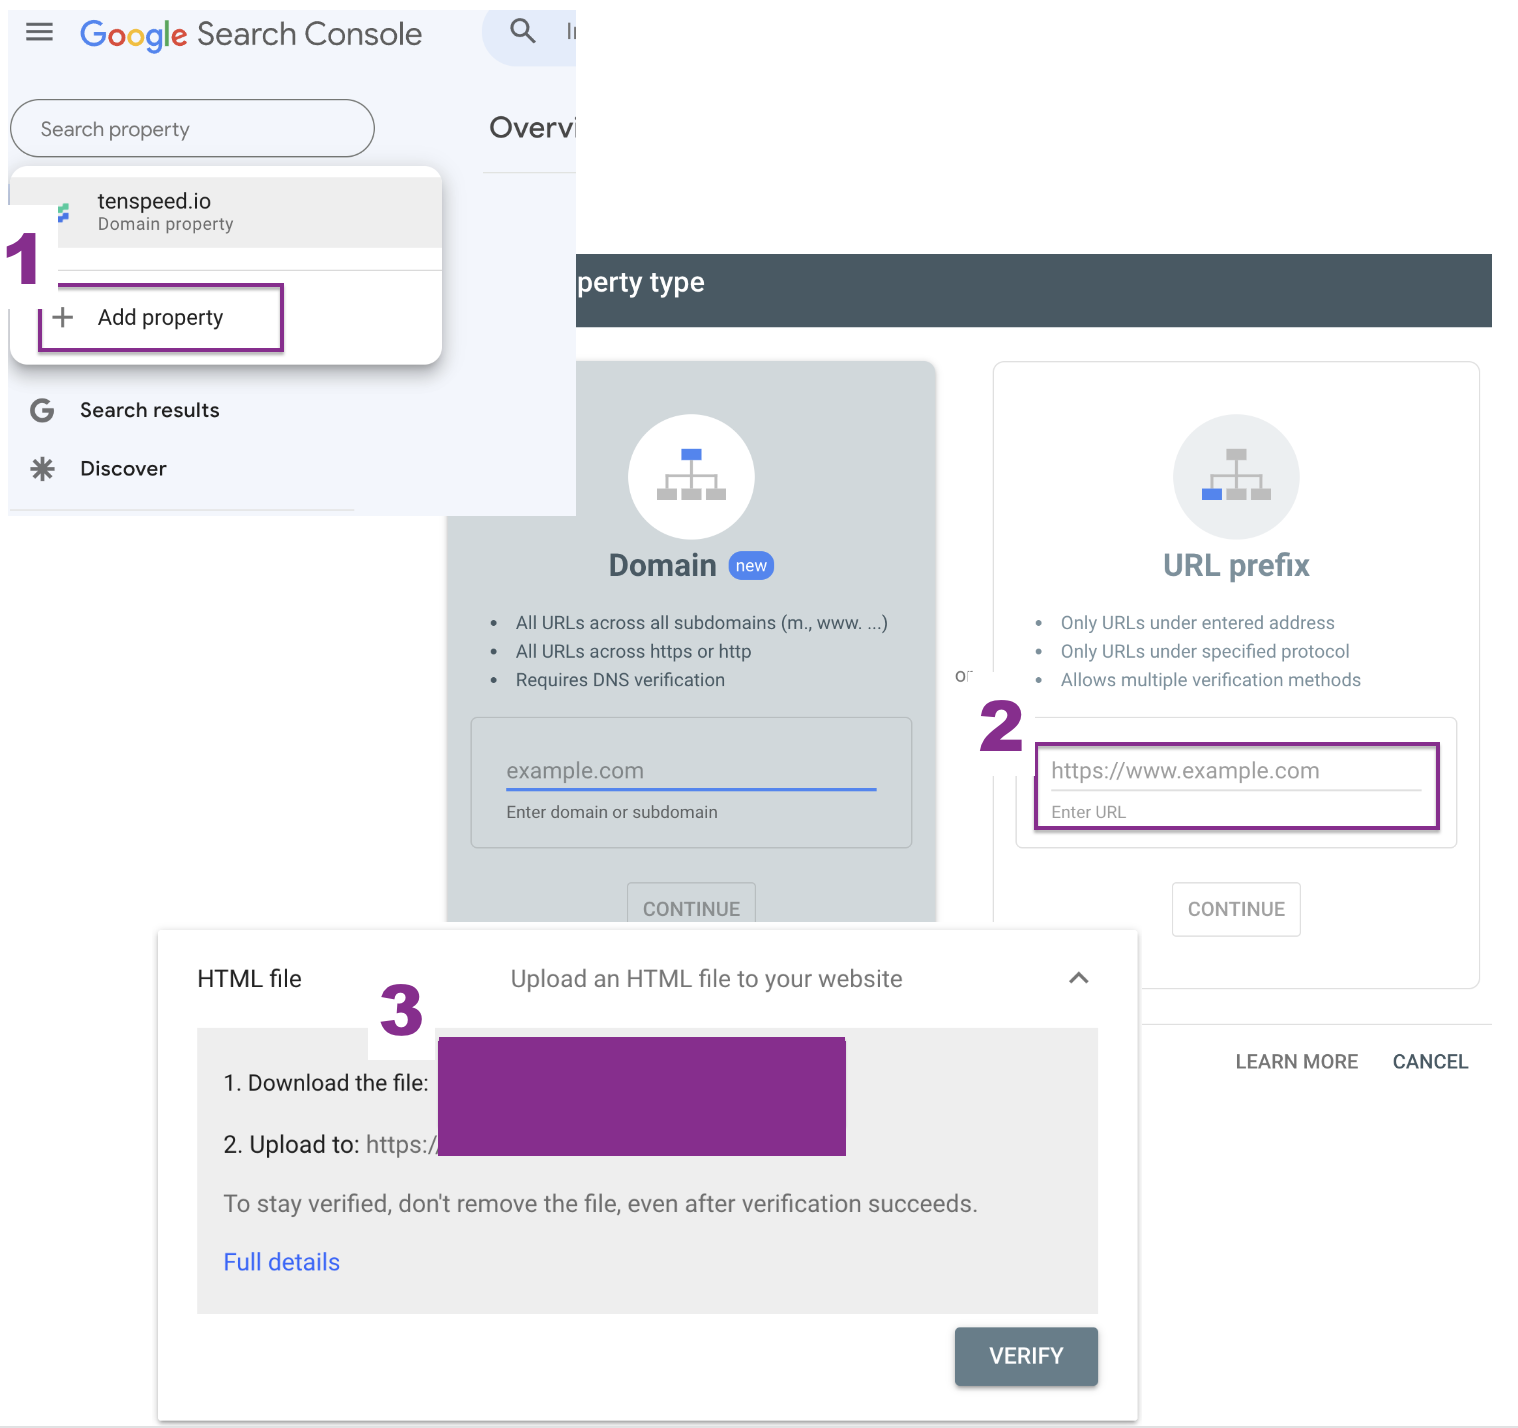
To get your site verification code:
- Go to Google Search Console and select “Add property.”
- Under the URL prefix column, enter your domain name with the full prefix.
- When prompted to download an HTML file, click “verify.”
- Copy that HTML snippet into the “Google Site Verification” field on Webflow.
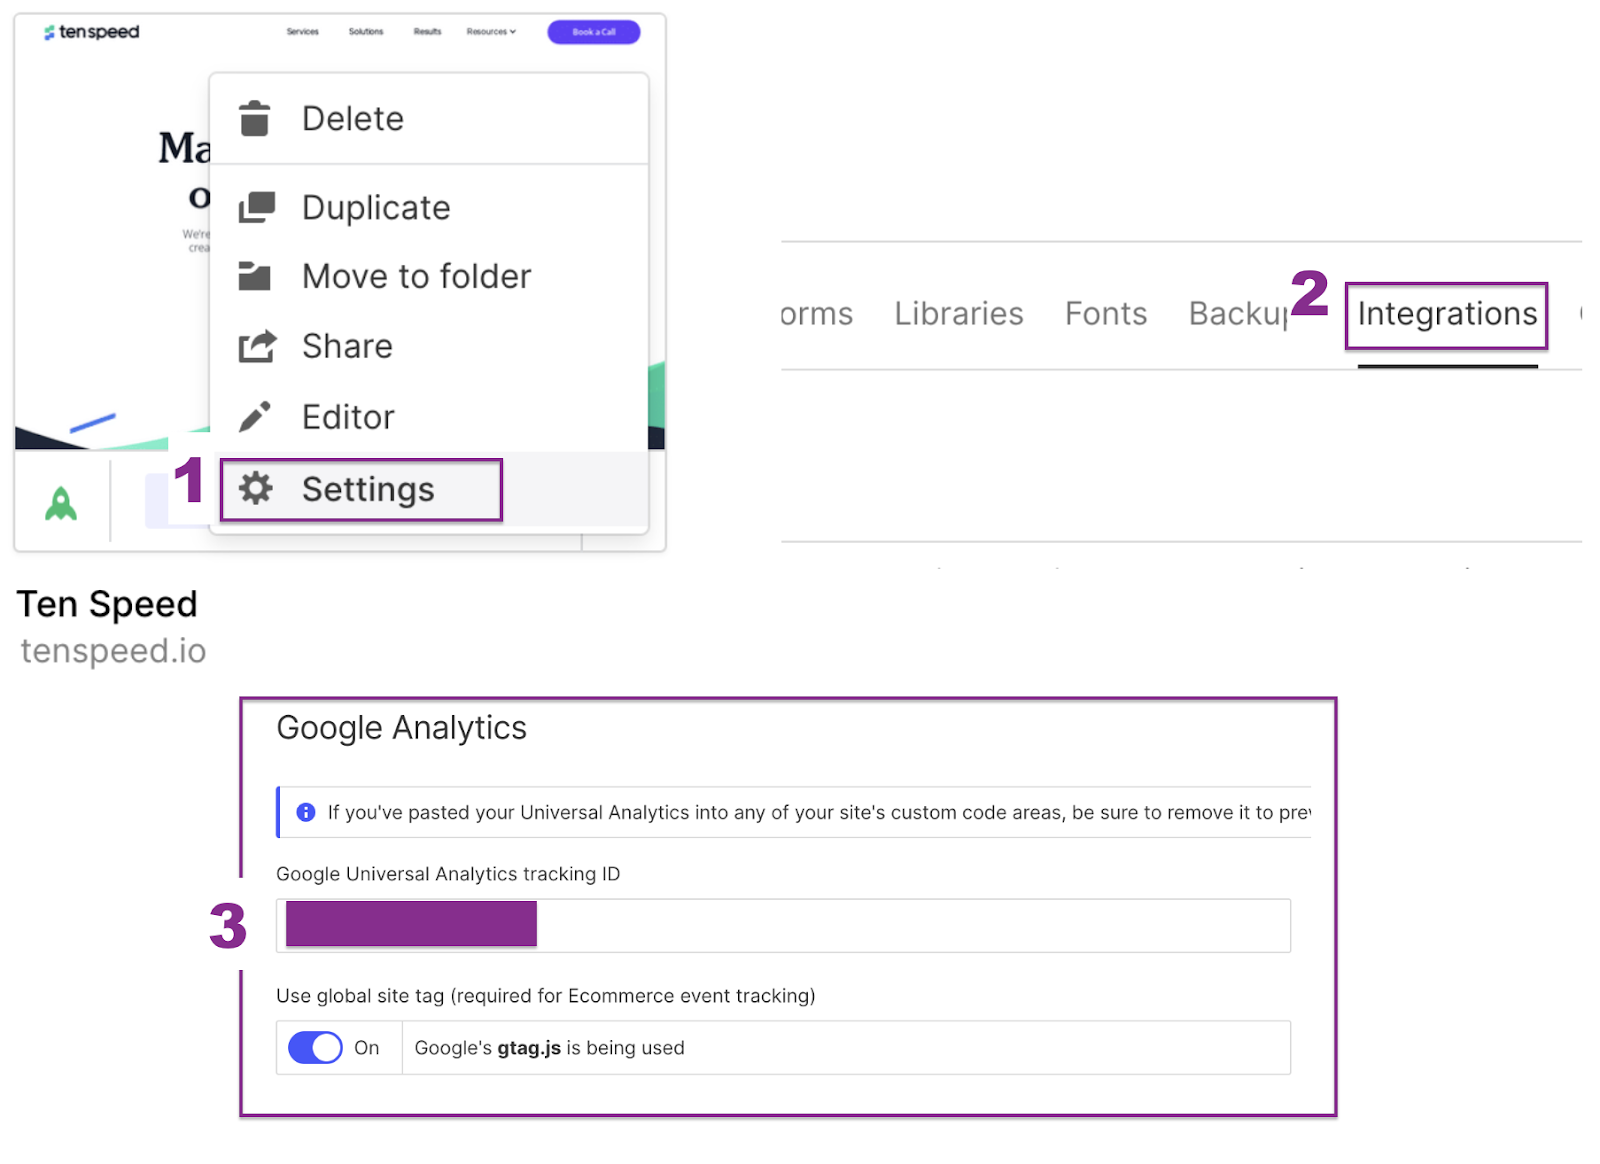
Google Analytics is also pretty straightforward. To ensure that your data from visitors is pulled into GA, you’ll simply:
- Go to the project settings for your website.
- Select the integrations tab.
- Add your GA4 tracking ID.
- We recommend turning the global site tag on so you can track more granular events.
To get your analytics tracking ID:
- Go to Google Analytics and select Admin Settings.
- Go through the steps of creating a property, and you’ll be given an ID.
- Enter that ID into the appropriate Webflow field above.
SEO tools for Webflow
Explore some of the top must-know SEO tools that will simplify optimizing your site with Webflow.
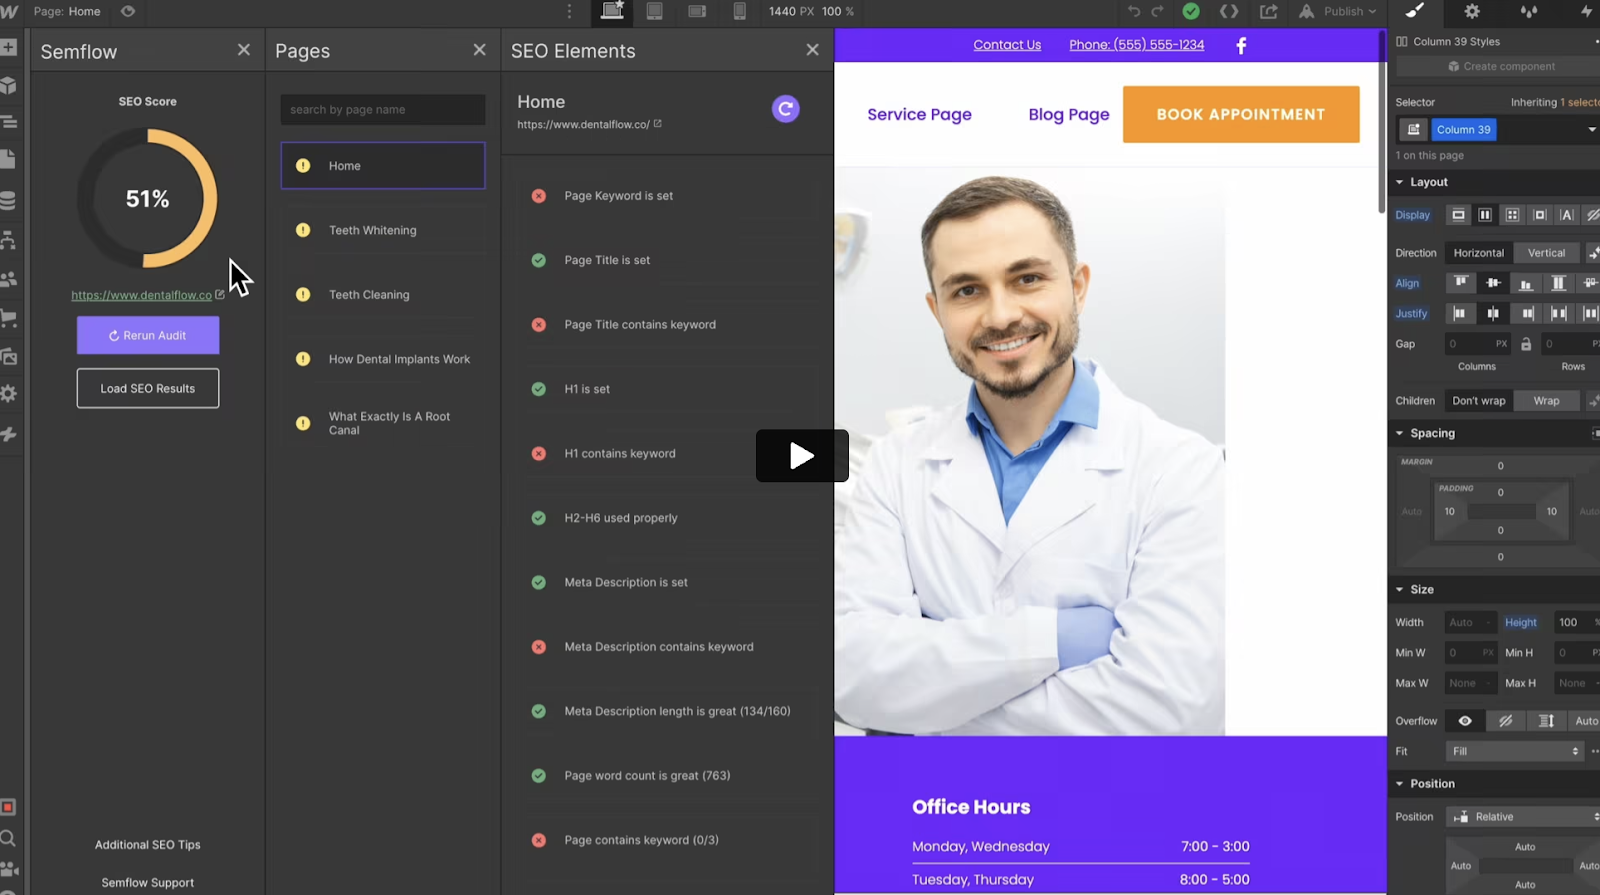
Semflow
Semflow is Webflow’s SEO tool for Yoast fans.
It’s designed for people who enjoy having a “best practices” checklist as a way to hold your team accountable for every page.
The tool allows you to conveniently edit some of the important SEO details like title tags and meta descriptions, indexation, and custom code. But that’s not all — you can also run site audits, manage the optimization of your site as a whole, and get recommendations on how to resolve SEO issues.
Letterdrop integration
Letterdrop is a user-friendly content creation tool that comes with SEO, collaboration, AI editing, and plenty of other helpful features for marketers at a Webflow agency. Distribution is made easy with increased CMS functionality and direct access to distribution channels.

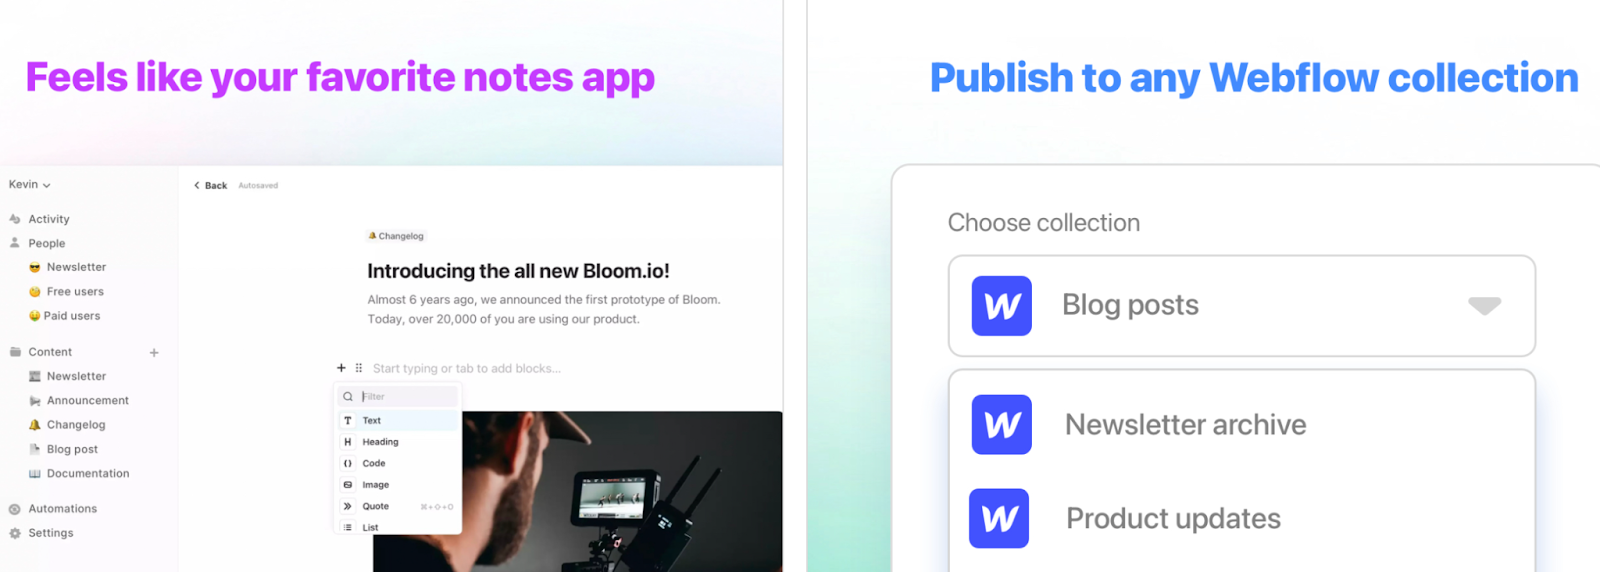
Audienceful: Email Marketing & Blogging App
Audienceful allows you to write and format your content, such as blogs, news articles, PR updates, or newsletters in a straightforward text editor.
Then, once you’re finished, you can publish it to any Webflow collection you like without needing to copy and paste everything.
Webflow SEO: Frequently asked questions
How does Webflow work for SEO?
SEO on Webflow works the same as on any other platform. You’ll need some time to locate where certain fields are within the navigation of the designer and editor functions.
You’ll also benefit from building metadata fields into the editor layouts so that freelancers and copywriters won’t need full web design access to make these small but essential additions to your URLs.
The hardest work in SEO takes place outside of any platform. You still have to do keyword research, satisfy search intent, organize your internal links, add schema markup, create long-form content, and attract backlinks.
How do I set page keywords in Webflow?
Webflow allows you to set page keywords easily by navigating to the Page Settings to include a title and meta description that accurately reflects the content on the page.
For Collection pages, you’ll also be able to use dynamic SEO settings to quickly implement keywords across multiple pages without breaking a sweat.
Is Webflow SEO better than WordPress?
Both platforms have their pros and cons.
On Webflow, it is often easier to make changes without needing to be versed in whatever web creation toolkit your developer uses. This is why many marketers prefer Webflow — especially in the startup phase — over a tool like WordPress.
You’ll find similar SEO functionalities on both Webflow and WordPress sites. But where most content marketers will recognize the difference is with plugins and ease of use.
If you’re a WordPress user, you’re familiar with the robust plugins that shortcut image sizing, create tables of contents, add title tag and meta description placements, create redirects, and even address some site speed hurdles.
Webflow prides itself on not needing plugins because the code is clean and functionality is straightforward. It also prevents the dreaded possibility of a plugin updating and breaking the website.
WordPress allows you to integrate several plugins, but Webflow offers many of the same capabilities with no plugins required. Webflow doesn’t require the same institutional knowledge of the site, making it accessible for small teams who may need to outsource.
For early-stage SaaS startups, we think Webflow can be a great, SEO-forward alternative to WordPress.
Does Google Optimize work with Webflow?
Yes, you can integrate Google Optimize with your Webflow website. You’ll do this after you enable Google Analytics, and then you can A/B test as much as you want.
Is Webflow hosting worth it?
We think so!
Webflow sites have high-quality assets and are designed to handle high traffic without sacrificing core vitals or responsive displays. As a Webflow agency, our clients have seen success from Webflow hosting and SEO.
Work with an SEO agency that’s familiar with Webflow
Webflow’s academy and forum are a wealth of information. Their videos are entertaining and easy to follow as well, so we highly recommend giving them a good look-through.
And you can always reach out to us. We handle a lot of Webflow issues related to SEO for our clients, including uploading their content for them, so we're all familiar with the platform.
And if you’d like additional help optimizing your SaaS website from an SEO and content marketing agency that built our own site on Webflow, you can book a call with us.
Or, if you want a closer look at our results, check out these case studies from clients with Webflow websites:
- Updating Existing Content and Accelerating Production for 133% Traffic Growth in <12 Months
- How We Helped a B2C SaaS Company Go From $0 to +$3.5m in Revenue With SEO-Focused Content


Discover how we can help.
Book a call with us and we’ll learn all about your company and goals.
If there’s a fit, we will put together a proposal for you that highlights your opportunity and includes our strategic recommendations.